They say that the best camera is the one you have with you. For a lot of us, that’s our iPhone camera. This post dives into iPhone photography tips that will help you improve your iPhone images.
This post contains affiliate links. Read the affiliate disclosure.

iPhone Photography Tips
As a professional photographer who has experienced a variety of cameras, the iPhone cameras continue to impress me. I actually started taking pictures with my iPhone and natural light from my apartment window when I first became interested in food photography.
As I developed a more serious interest in food photography, my curiosity about learning about other cameras and equipment developed naturally. My cameras include the Nikon D750, the FujiFilm XT3 and the FujiFilm XT4.
And, while I don’t use my iPhone for client work, I still take a sh*t ton of pictures with it and even developed an online course called Mastering iPhone Food Photography, if you want to check it out.
Let’s discuss some iPhone photography hacks so you can start improving your images!

Tip 1: Clean off your lens
This may sound like a no-brainer, but it’s easy to forget how dirty the iPhone lens can get. It’s constantly exposed and it can easily pick up dust, smudges or other particles. Be sure to wipe it off so nothing is interfering with you capturing a clear image. I have used my shirt sleeve to do this, but I also have these wipes on hand that come with microfiber cloths. These wipes also work well with other sensitive surfaces that you don’t want to get scratched.
Tip 2: Turn on the grid
Image composition is really important in photography and refers to how you arrange elements or subjects within the frame. The grid is a great guide to help you practice different compositions.
When you turn the grid on, it will appear as a subtle overlay on your screen and won’t show up in your images. The grid will display two vertical lines and two horizontal lines creating nine squares. Where the grid lines intersect is where you could consider placing your subject. This is known as the Rule of Thirds and is a great starting point for practicing different ways to frame your subject.
To turn the grid on, go to your Settings / Camera / Grid and make sure that it’s activated (green).
READ MORE ABOUT: FOOD PHOTOGRAPHY COMPOSITION TIPS

Tip 3: Adjust your focus & exposure
FOCUS
Have you ever taken a picture to later realize it’s not in focus? It’s the worst, right? To ensure that your image is in focus, tap the screen where you want your iPhone camera to focus. A yellow box will appear indicating where the phone is focusing. I call this the focus box.
EXPOSURE
You’ll also see a sunshine icon next to the focus box. This helps you adjust your exposure. If you move the sunshine icon up, you’ll make your image brighter. If you move the sunshine icon down, you’ll make the image darker. This is a great way to start experimenting with the exposure of your images.

Tip 4: Lock your focus & exposure
Manually focusing (tapping) and adjusting your exposure is easy and convenient, but if you don’t want to do this each time you take a picture, you can lock your focus and exposure.
To do this, tap and hold your finger on the screen. You’ll see a yellow block called “AE/AF Lock” at the top of the screen, which means your focus will be locked while you take pictures. It will also hold the exposure as well, unless you want to adjust it a bit by moving the sunshine icon up or down. To undo the locked focus, just tap the screen again and it will unlock.

Did you know that the volume buttons aren’t just for adjusting your iPhone volume? When the camera app is open, the volume buttons turn into your shutter button. Use them to take a picture if tapping the circle isn’t as convenient.

Tip 6: Try portrait mode
Portrait mode is a fun option to play with because it creates that dreamy “blurry” background behind your subject. This is also known as your depth of field.
There are a lot of very expensive DSLR lenses that create this effect in professional photography. The cool thing with the iPhone is you don’t need a separate lens to adjust your depth of field.
HOW TO ADJUST PORTRAIT MODE
To adjust the amount of blur you see in the background, follow these steps:
- Select Portrait mode.
- Click the “f ” in the circle in the upper right corner.
- Use the slider beneath the image to adjust how strong you want the blur to be.
The iPhone lens has a portrait mode range of f1.8 to f16. The lower the number, the more background blur you’ll see. The higher the number, the sharper the background will be. Pretty cool, right!?
See my examples below and notice the setting within the red circle.
The phone on the far left is set to f1.4 (the lowest number) and it has a significant amount of blur in the background… a little too much, if you ask me. 😉
The phone in the middle is set to f5.6 and has a more subtle blur to the background.
The phone on the far right is set to f16 and has a much sharper background.

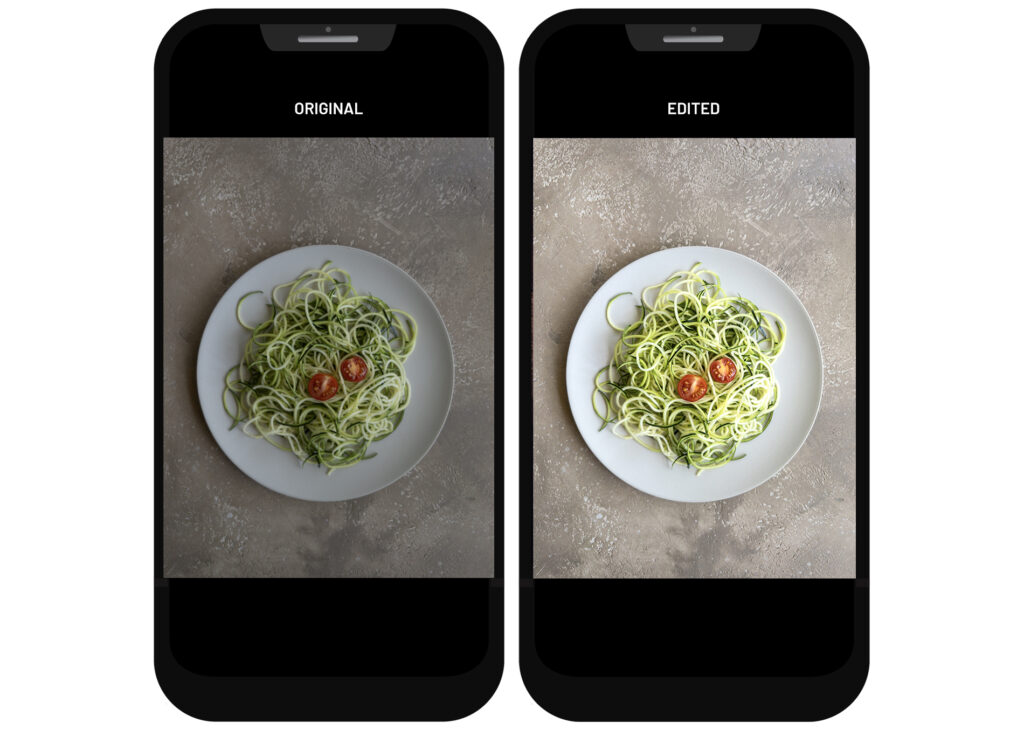
Tip 7: Edit your images
Editing is an important part of the photography process. I see a lot of people take pictures with their smartphone and not edit any of them. No matter what camera you use, your images can appear flat and muted without some editing.
You can start experimenting with editing using the standard camera app in your iPhone. It has some basic editing features that will introduce you to the power of editing.
Open the image you want to edit, click Edit and you’ll get three icons sitting beneath your image.
ADJUST TOOL
The first icon on the left looks like a circle with dots around it. This is your ADJUST option which lets you adjust the exposure, brightness, shadows, contrast, saturation, etc. There are a lot of options to play with in the Adjust option, so take some time to make different adjustments and watch how it affects your image.
FILTERS TOOL
The second icon in the middle looks like three intersecting circles. This is your default FILTERS option which lets you scroll through a variety of filters that you can apply to your image.
CROP TOOL
The third icon looks like a square with arrows. This is your CROP option which lets you crop, straighten or rotate your image.
Have some fun with each of these, because there’s a lot of ways to edit your images using these three simple features built right into your smartphone camera.

If you want to go beyond the standard iPhone camera app, check out these awesome editing apps below.
Tip 8: Take An Online Course
An online course is a great way to improve your photography skills quickly. Check out my signature course, Mastering iPhone Food Photography. It’s your one-stop-shop for everything you need to know about iPhone food photography full of videos, screen recordings and behind-the-scenes demonstrations to help you significantly improve your food images using your smartphone camera. The course is currently under 4 hours long and you get lifetime access to it. Take it when your schedule allows and refer back to it anytime you need it. 😍
iPhone Photography Tools
Now that we’ve covered some iPhone camera tips, let’s dive into some tools that will come in handy while you practice improving your iPhone photography skills.
Tip 9: Get Diffusers and Foam Boards
When taking pictures with your iPhone camera, you are probably using natural light. Natural light is beautiful, but it’s constantly changing which can make it tricky to control without some basic tools to help you.
I recommend looking into light modifiers. Light modifiers include things like diffusers and black and white foam boards. They come in a variety of sizes and you can find quite a variety on Amazon.
DIFFUSORS
Diffusors will help you soften strong sunlight and by spreading it out more evenly over your subject. You simply place the diffusor between your subject and your light source. For example, I often place diffusers over my window when shooting food with natural light. It doesn’t block the light, it simply softens it.

FOAM BOARDS
Foam boards are great for shaping the light and bouncing light back to your subject.
White foam boards bounce light back to your subject if one side of your image is getting too dark. For example, if you have a plate of food next to the window, it’s possible the side furthest from the window could appear darker. If you set up a piece of white foam board opposite the window (and next to your food), it will bounce light back from the window and make that darker side appear brighter. It’s a very cool trick that can make a big difference in how well your images are lit.

Black foam boards can help you add more contrast and shadows to your image. You can place these near your subject and move them around to see how different placements can direct and affect the shadows in your image.

Tip 10: Stabilize Your iPhone
Holding the smartphone is a very convenient way to shoot, but I want to push you to try something different. One of the biggest gamer-changers for iPhone photography is being able to stabilize your iPhone on a tripod.
The best tripod setup for your iPhone includes:
The tripod with a center column, allows you to position your iPhone at any angle, including overhead shots. You’d be amazed how many iPhone tripods do not support an overhead angle, so this is a solid option to help you capture any angle you want.
MANFROTTO 055 TRIPOD WITH CENTER COLUMN & BALL HEAD

A metal iPhone tripod mount will help secure your iPhone to the tripod. It’s made of metal and very secure and allows you to easily position the iPhone camera for a vertical or horizontal shot. It also doesn’t interfere with your iPhone screen at all. Check out the post below for more information about my go-to tripod setup for iPhone photography.
READ MORE ABOUT: THE BEST TRIPOD FOR IPHONE FOOD PHOTOGRAPHY
METAL IPHONE TRIPOD MOUNT


Tip 11: Bluetooth Remote Camera Shutter for iPhone
Now that we’ve covered getting a tripod for your iPhone, the next tool I recommend is a remote camera shutter release. This tool comes in handy for two reasons:
- Pressing the shutter button on your iPhone could cause the camera to shake a little, resulting in blurry images.
- You may not be near your iPhone to take the picture.
I have this bluetooth remote shutter and it’s compatible with most smartphones on the market. It’s really small and convenient to carry with you and has been super reliable for me.

Tip 12: iPhone Portable Charger
Smartphone batteries can be unpredictable and some run out of juice really fast. Having a fast portable charger with you comes in handy, especially if you need to recharge quickly.

Tip 13: Smartphone Lenses
Did you know you can use different lenses with your smartphone? Not only are the cameras improving significantly, but now you can use different lenses to capture a variety of different perspectives.
I’ve tested a variety of smartphone lenses on the market and haven’t been impressed with most of them. The “clip-on” lenses are really hard to position perfectly over your smartphone lens and will interfere with the lens if it’s not juuuuuuust right. Clip-on lenses may be more affordable, but trust me when I say, cheaper is not better when it comes to photography lenses.
The lenses that I confidently recommend for smartphone cameras are the Moment Lenses.
In order to attach the Moment Lenses to your smartphone, you will also need to buy a separate phone case. It’s an extra accessory to buy, but they look great and are super easy to use. The Moment Lenses twist right into the case so the lens is secured in the right place. To remove it, you simply untwist it. Not to mention, the glass is top-notch helping you capture beautifully sharp images from afar or up close. I’m sharing two lens recommendations below.
Moment Wide Angle Lens
If you’re looking for a beautiful, ultra wide angle lens for your iPhone without too much distortion, this Moment Wide Lens is a really great option. It’s great for travel, landscapes and interior spaces.


Moment Macro Lens
Macro lenses let you get super close to your subject so you can capture every little detail with impressive sharpness. If you’re interested in getting up close and personal with the details of your subject, this Moment Macro Lens is a really good one to check out.
Keep in mind, you have to be about an inch away from your subject to capture a sharp, up close image. It’s really stunning what it can do, but it won’t work well if you can’t get that close to your subject.


I hope you found these iPhone photography tips helpful! Honestly, I’m just scratching the surface with all the fun options you have to improve your iPhone photography. Remember, photography is not about what camera you have – it’s about knowing how to use the camera you have. Take the time to learn more about your iPhone camera. You’ll be amazed at what you can do with it.
NOTE: The doors to my signature course, Mastering iPhone Food Photography are open! This is your one-stop-shop that includes professional guidance through a variety of videos, screen recordings and behind-the-scenes demonstrations to help you learn how to improve your iPhone food photography quickly!
Happy Creating!
—
This post contains affiliate links which means if you click or make a purchase through my site, I might make a small commission at no extra cost to you. I only promote products that I actually use and support.
All images ©Regan Baroni 2021.

Comments +