Are you looking to learn how to shoot splash photography? Well, look no further, because this post will show you how I do it. Splash shots are super fun to shoot and can totally elevate your portfolio of drink images. It just takes certain steps to capture it perfectly and some of the steps just might surprise you. So, come behind the scenes with me and learn how I approach splash photography in my home studio by myself. 😉
This post contains affiliate links. Read the affiliate disclosure.
How To Shoot Splash Photography
For this splash photography demonstration, I’m going to use some basic things that I have on hand at home. No special props or complicated drink recipes needed when you’re first getting started. That stuff can come later after you learn the basic steps involved with capturing splash photography. For this demonstration, I’m going to use the following items:
- Bourbon Glass
- Bourbon
- Fake ice cubes
If you want to save your bourbon, you can make “fake bourbon” by mixing maple syrup and water together. That would make this more of a water splash rather than a bourbon splash, but your secret is safe with me. 😉
Step 1: Set Up Your Equipment
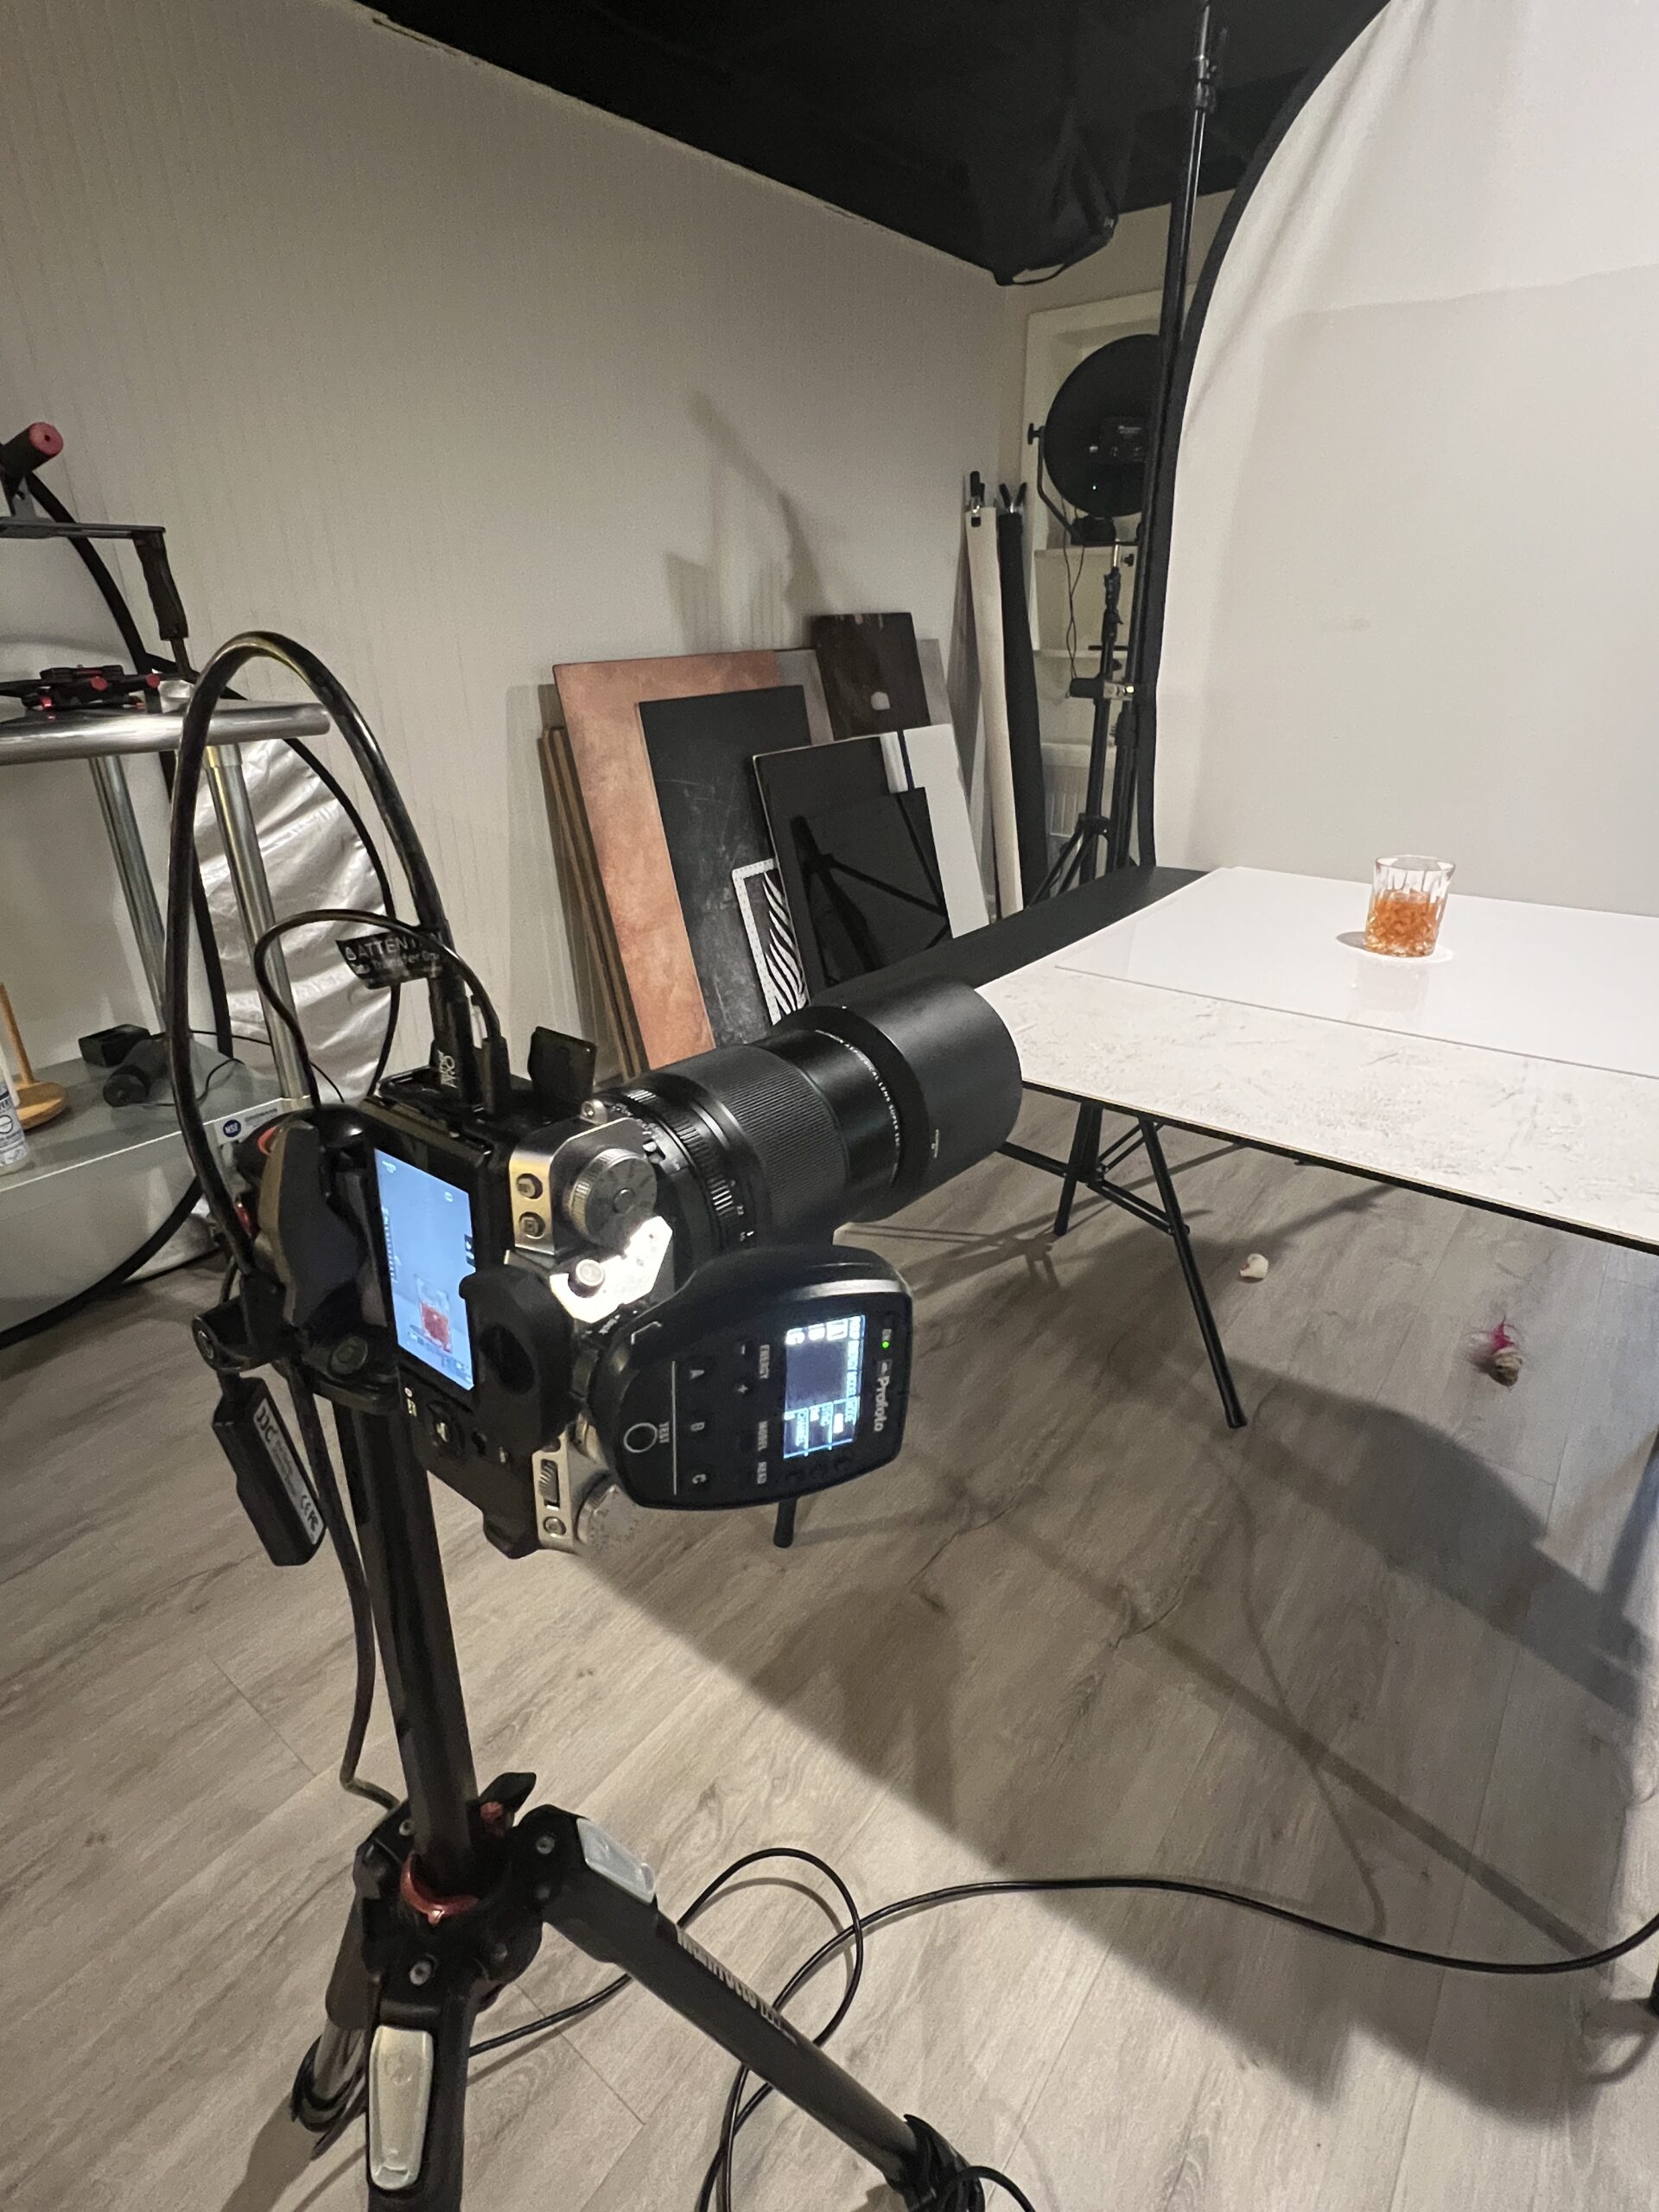
Below is a list of the equipment that I am using and behind the scenes images showing how I set things up.
Camera & Lens
I am shooting this splash demonstration with my Fuji XT5 and my 80mm macro lens. This lens allows me to capture the details of the splash up close without having to be that close to the action. Splashes get messy, so setting up further away from the action helps prevent your camera and lens from getting wet. I am stabilizing my camera on a tripod and positioning it in front of the glass and at a straight on angle.
Focus Your Lens Manually
For splash shots, I always set my focus manually. If my lens is set to auto focus, the lens can have a hard time knowing where to focus since splashes create a lot of movement. Setting your focus manually may seem a little daunting at first, but shooting tethered will help you ensure that your lens is focused correctly.
Use A Remote Shutter Release
If you’re trying to capture a splash by yourself, you’ll want to have a remote shutter release to help you. You have to be near your camera to take the picture and you have to be near the glass to drop ice into it. Since I haven’t figured out how to be in two places at once, a remote shutter is the best solution. This will allow you to be near the glass so you can drop the ice into it and fire your camera. Just make sure your remote shutter is compatible with your camera model.
Shoot Tethered
I highly recommend shooting tethered for splash photography. This means you can review your shots on your computer as you shoot. It can take several splash shots before you get the one you like and being able to review your images on a larger screen is incredibly helpful to be sure you like the details you’re capturing.
To shoot tethered, you need a tether cable that can connect your camera to your computer and editing software like Lightroom or Capture One. Just be sure the tether cable is compatible with your camera model and computer port.
READ MORE ABOUT: HOW TO SHOOT TETHERED FOR FOOD PHOTOGRAPHY

Lighting & Modifiers
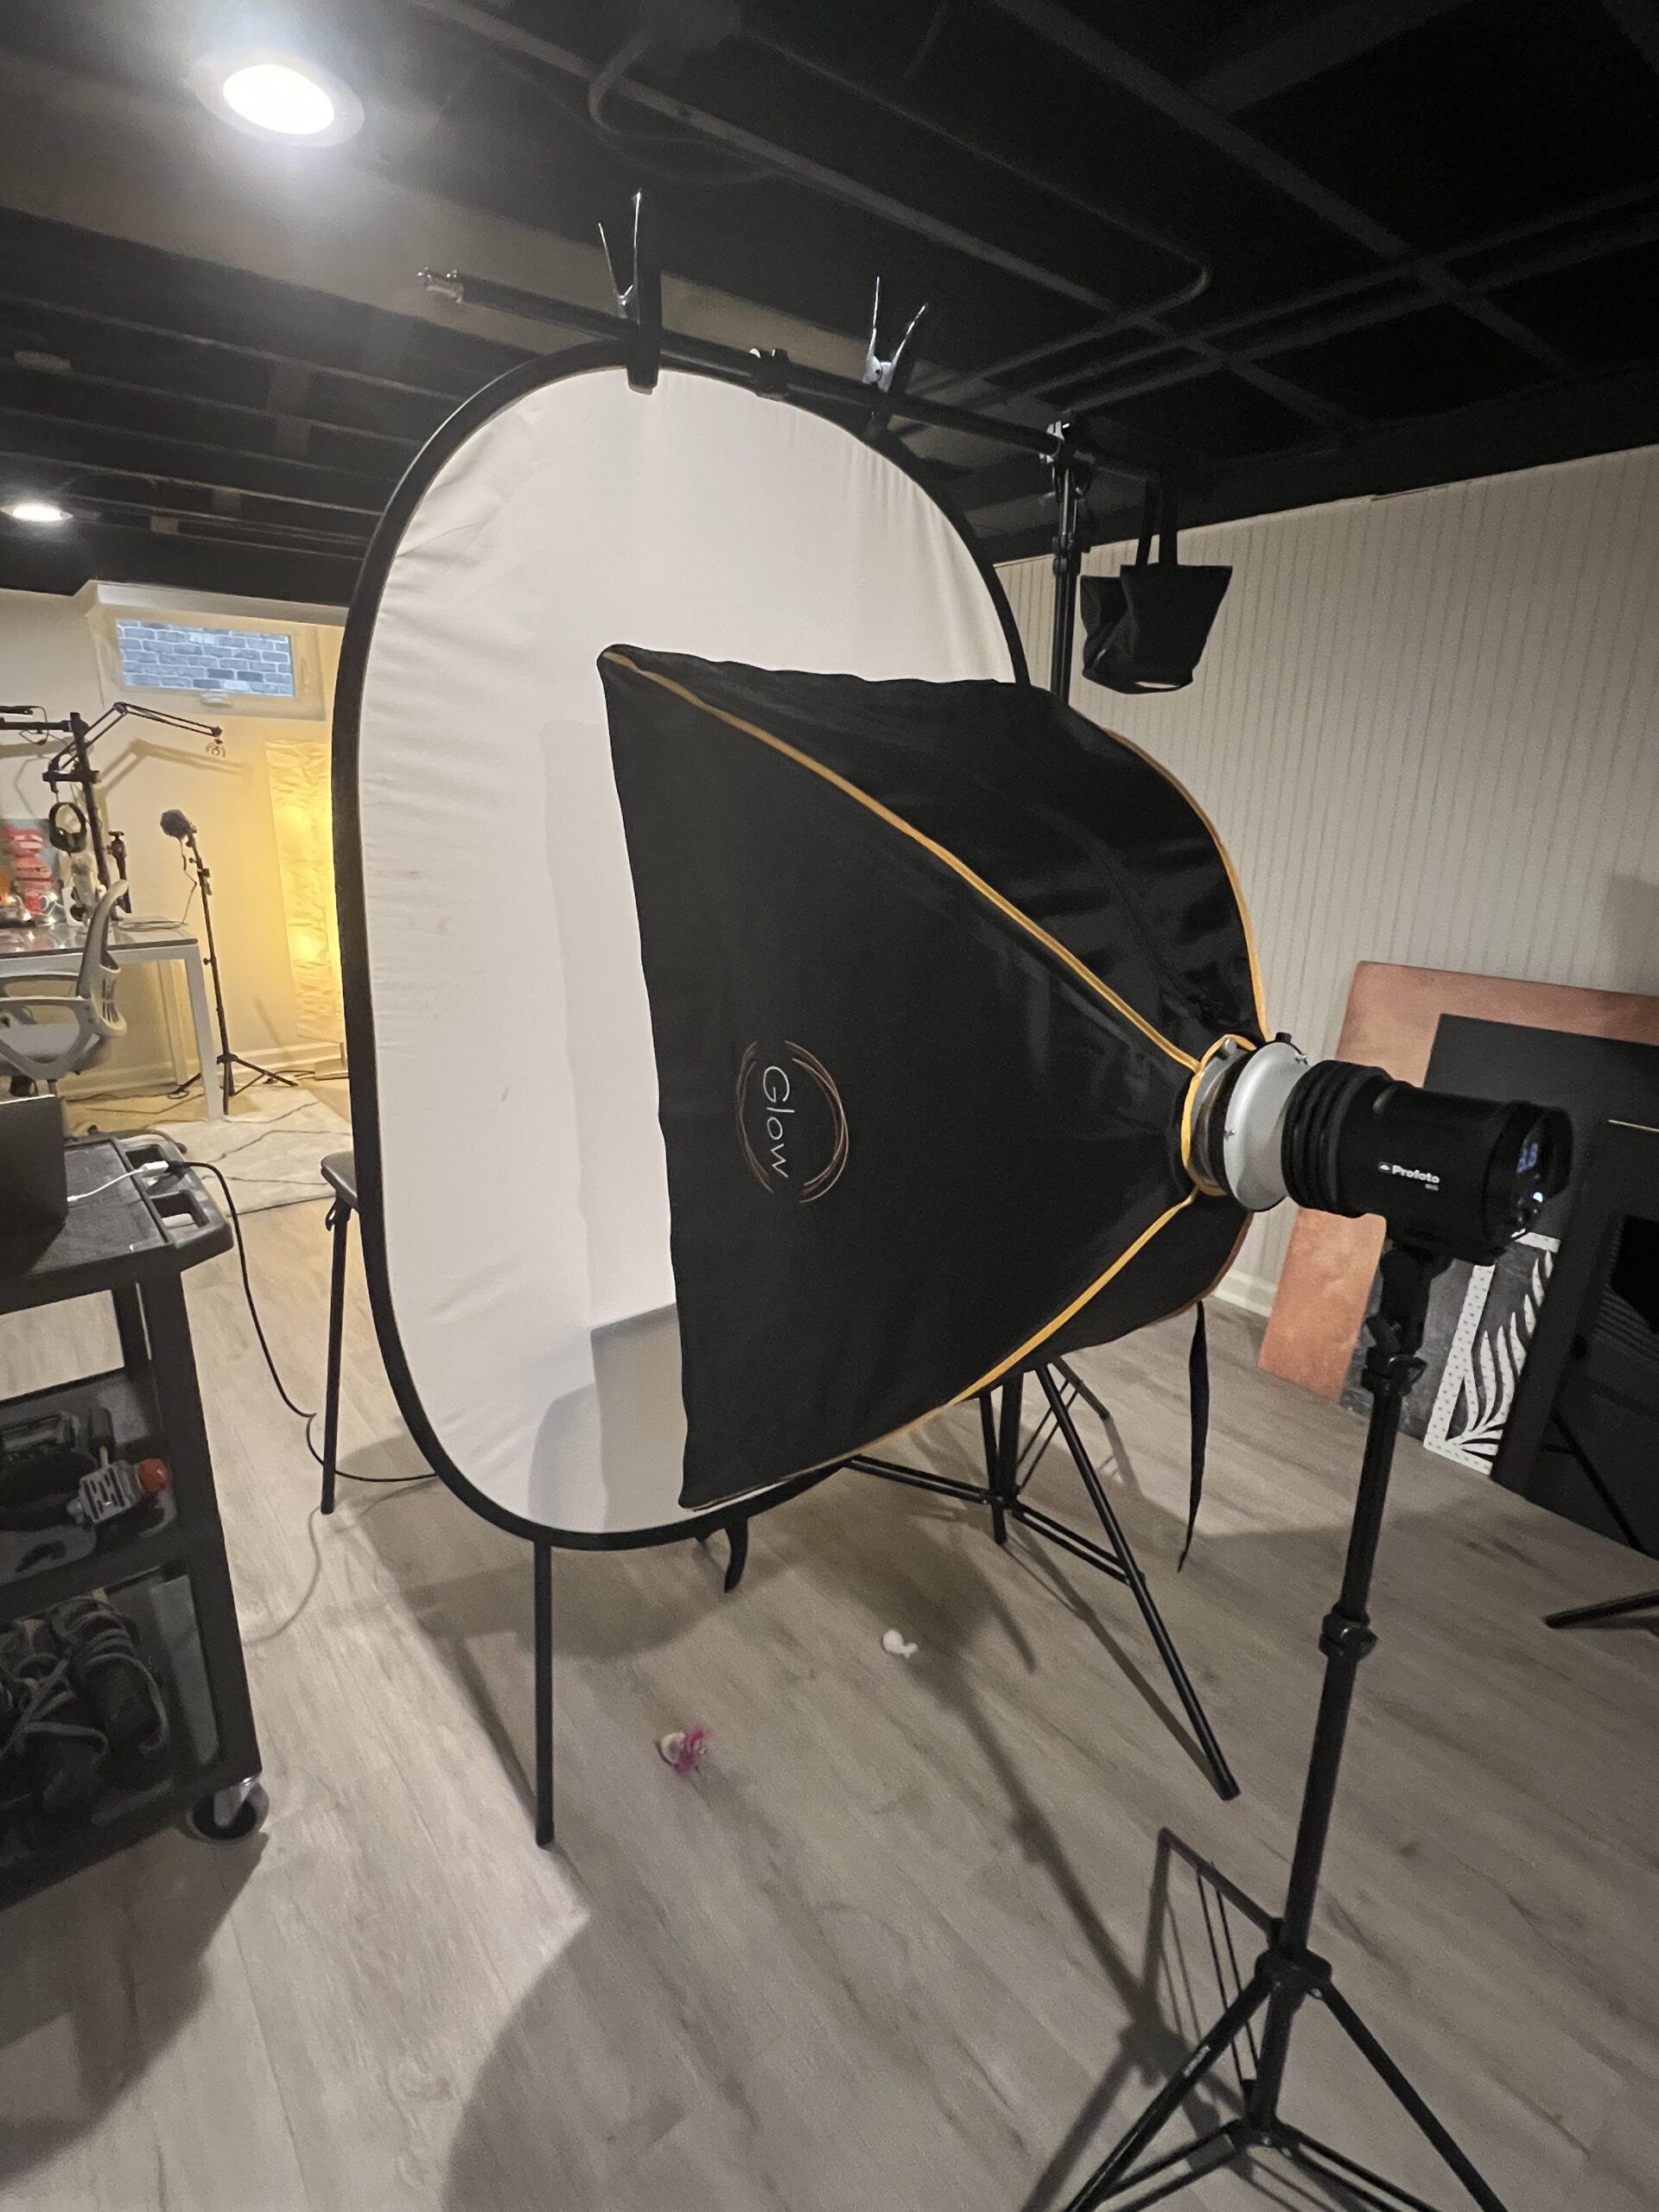
For my studio lights, I am using a Profoto B10 strobe with an EZ Glow Octo Softbox. I use this Bowen’s mount adaptor to connect my soft box to my strobe since Profoto lights are not Bowen’s mount compatible.
I decided to set up a strobe behind my wine glass, because I love using back lighting with drinks. And I decided to use double diffusion with the soft box and a large diffuser to keep the lighting extra soft on the glass. I also use a wireless Profoto Transmitter on my Fuji camera. This helps my flash and camera talk to each other. Then, I can adjust my shutter speed to be the correct sync speed with my light. The goal is to have the studio light and camera fire at the exact same time.
READ MORE ABOUT: PROFOTO BOWENS ADAPTOR
Surfaces & Backdrops
The surface I used is a reflective white surface from Amazon. Reflective surfaces can be really pretty with drinks because it gives you that reflection beneath the glass.
READ MORE ABOUT: THE BEST BACKDROPS FOR FOOD PHOTOGRAPHY

Step 2: Capture The Splash
The next steps below walk you through the steps involved for how to capture a splash. It’s important to note that you cannot move your camera or the glass at all during the photo shoot, so it’s important to keep your camera stabilized on a tripod and be very cautious when dropping ice into the glass.
Camera Settings
For this demonstration, my camera settings were the following:
- Aperture: f16
- Shutter Speed: 1/200
- ISO: 200
Shoot The Empty Glass And Clean Surface First
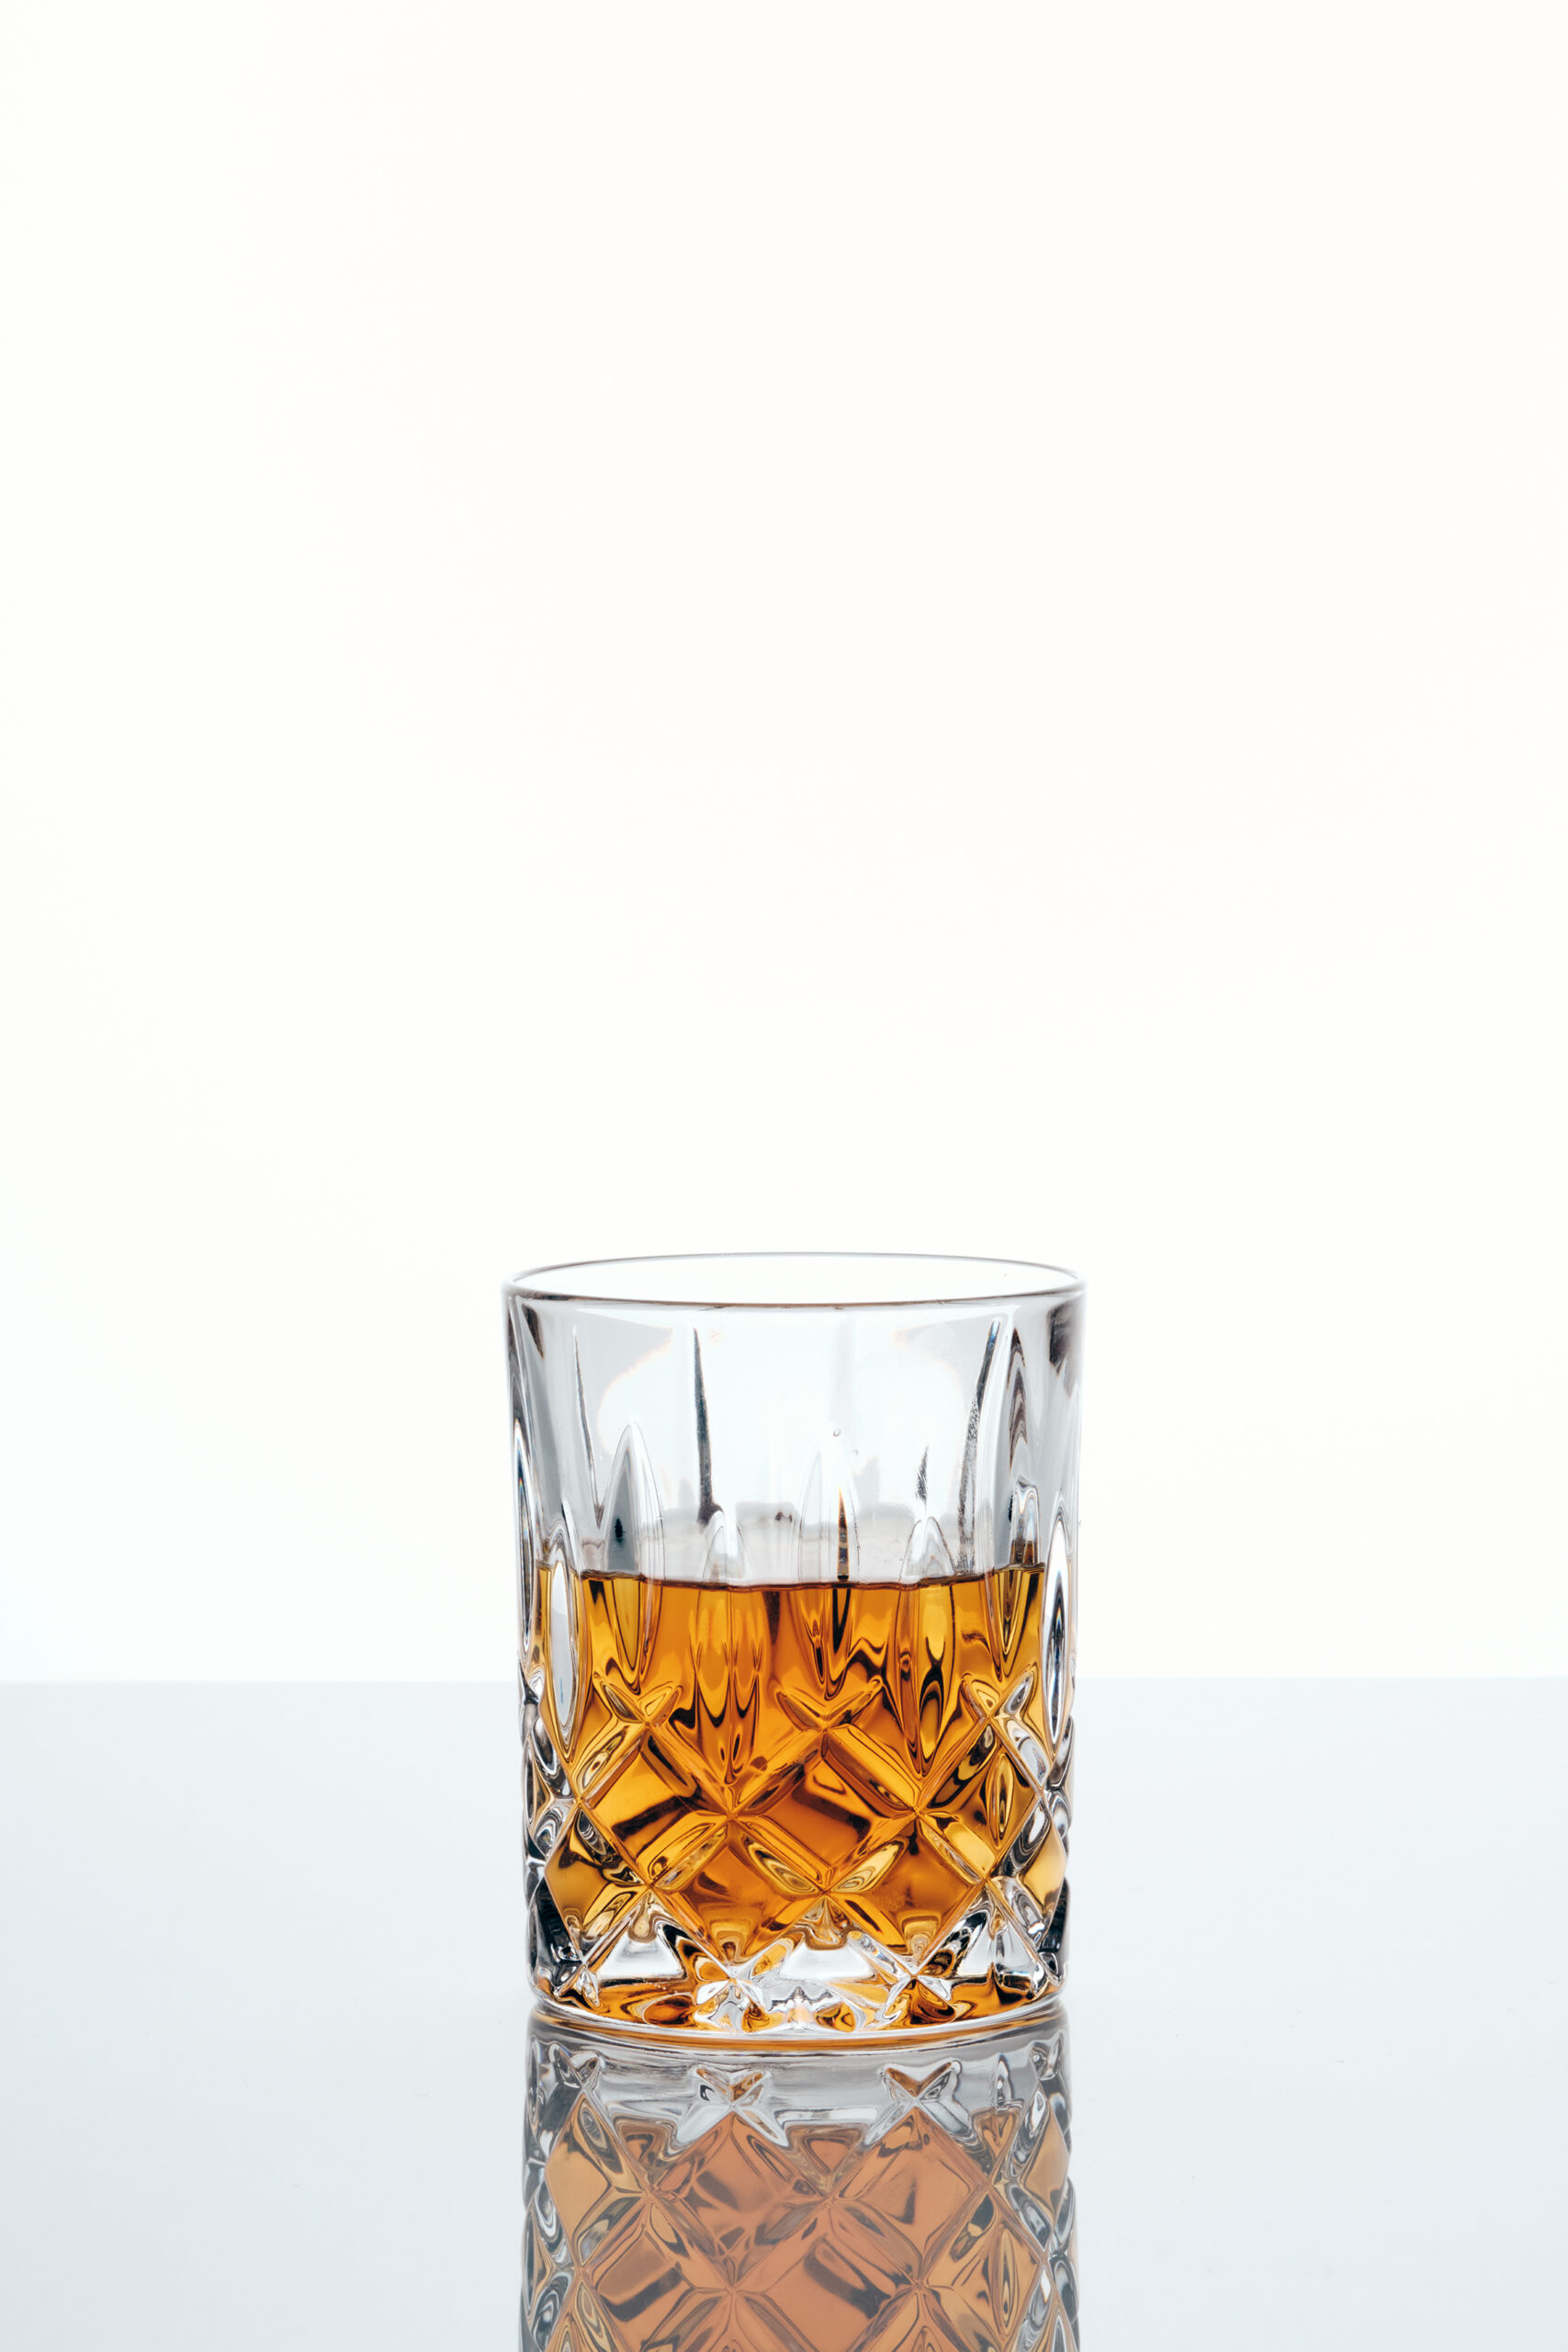
The first image you want to shoot is actually a clean shot of the empty glass. The surface and backdrop will be dry and the glass should be crisp and clean. See my example image below.
Start Splashing
Once you have a nice, clean shot of the glass and surface, the fun part begins! Now, you can start dropping the ice cubes into the glass to capture the splashes. It can take a lot of shots before you get a splash that you like, but have fun with it and don’t be afraid to get messy.
PRO TIP: It helps to use a remote shutter so you can be next to the glass to drop the ice cubes in and still be able to fire your camera. It can take a few tries to get the timing just right.
Use Continuous Mode
Continuous mode is a method of shooting where your camera will take several shots with one click of the shutter. (This is similar to burst mode on the iPhone camera.) This method can come in handy when shooting action shots like splashes.
If you are using an artificial light, however, you’ll want to be sure the recycle time of your light is fast enough to support shooting in continuous mode. And if your light’s recycle time isn’t fast enough, you’ll notice inconsistencies between the shots since some images will look darker than others.
If the recycle time on your light isn’t fast enough, you can set your camera to just take a single shot at a time and use your remote shutter to time the shot just right. It might take a couple of extra shots to get the splash you want, but it’s a good backup plan to ensure your lighting is consistent throughout your images.
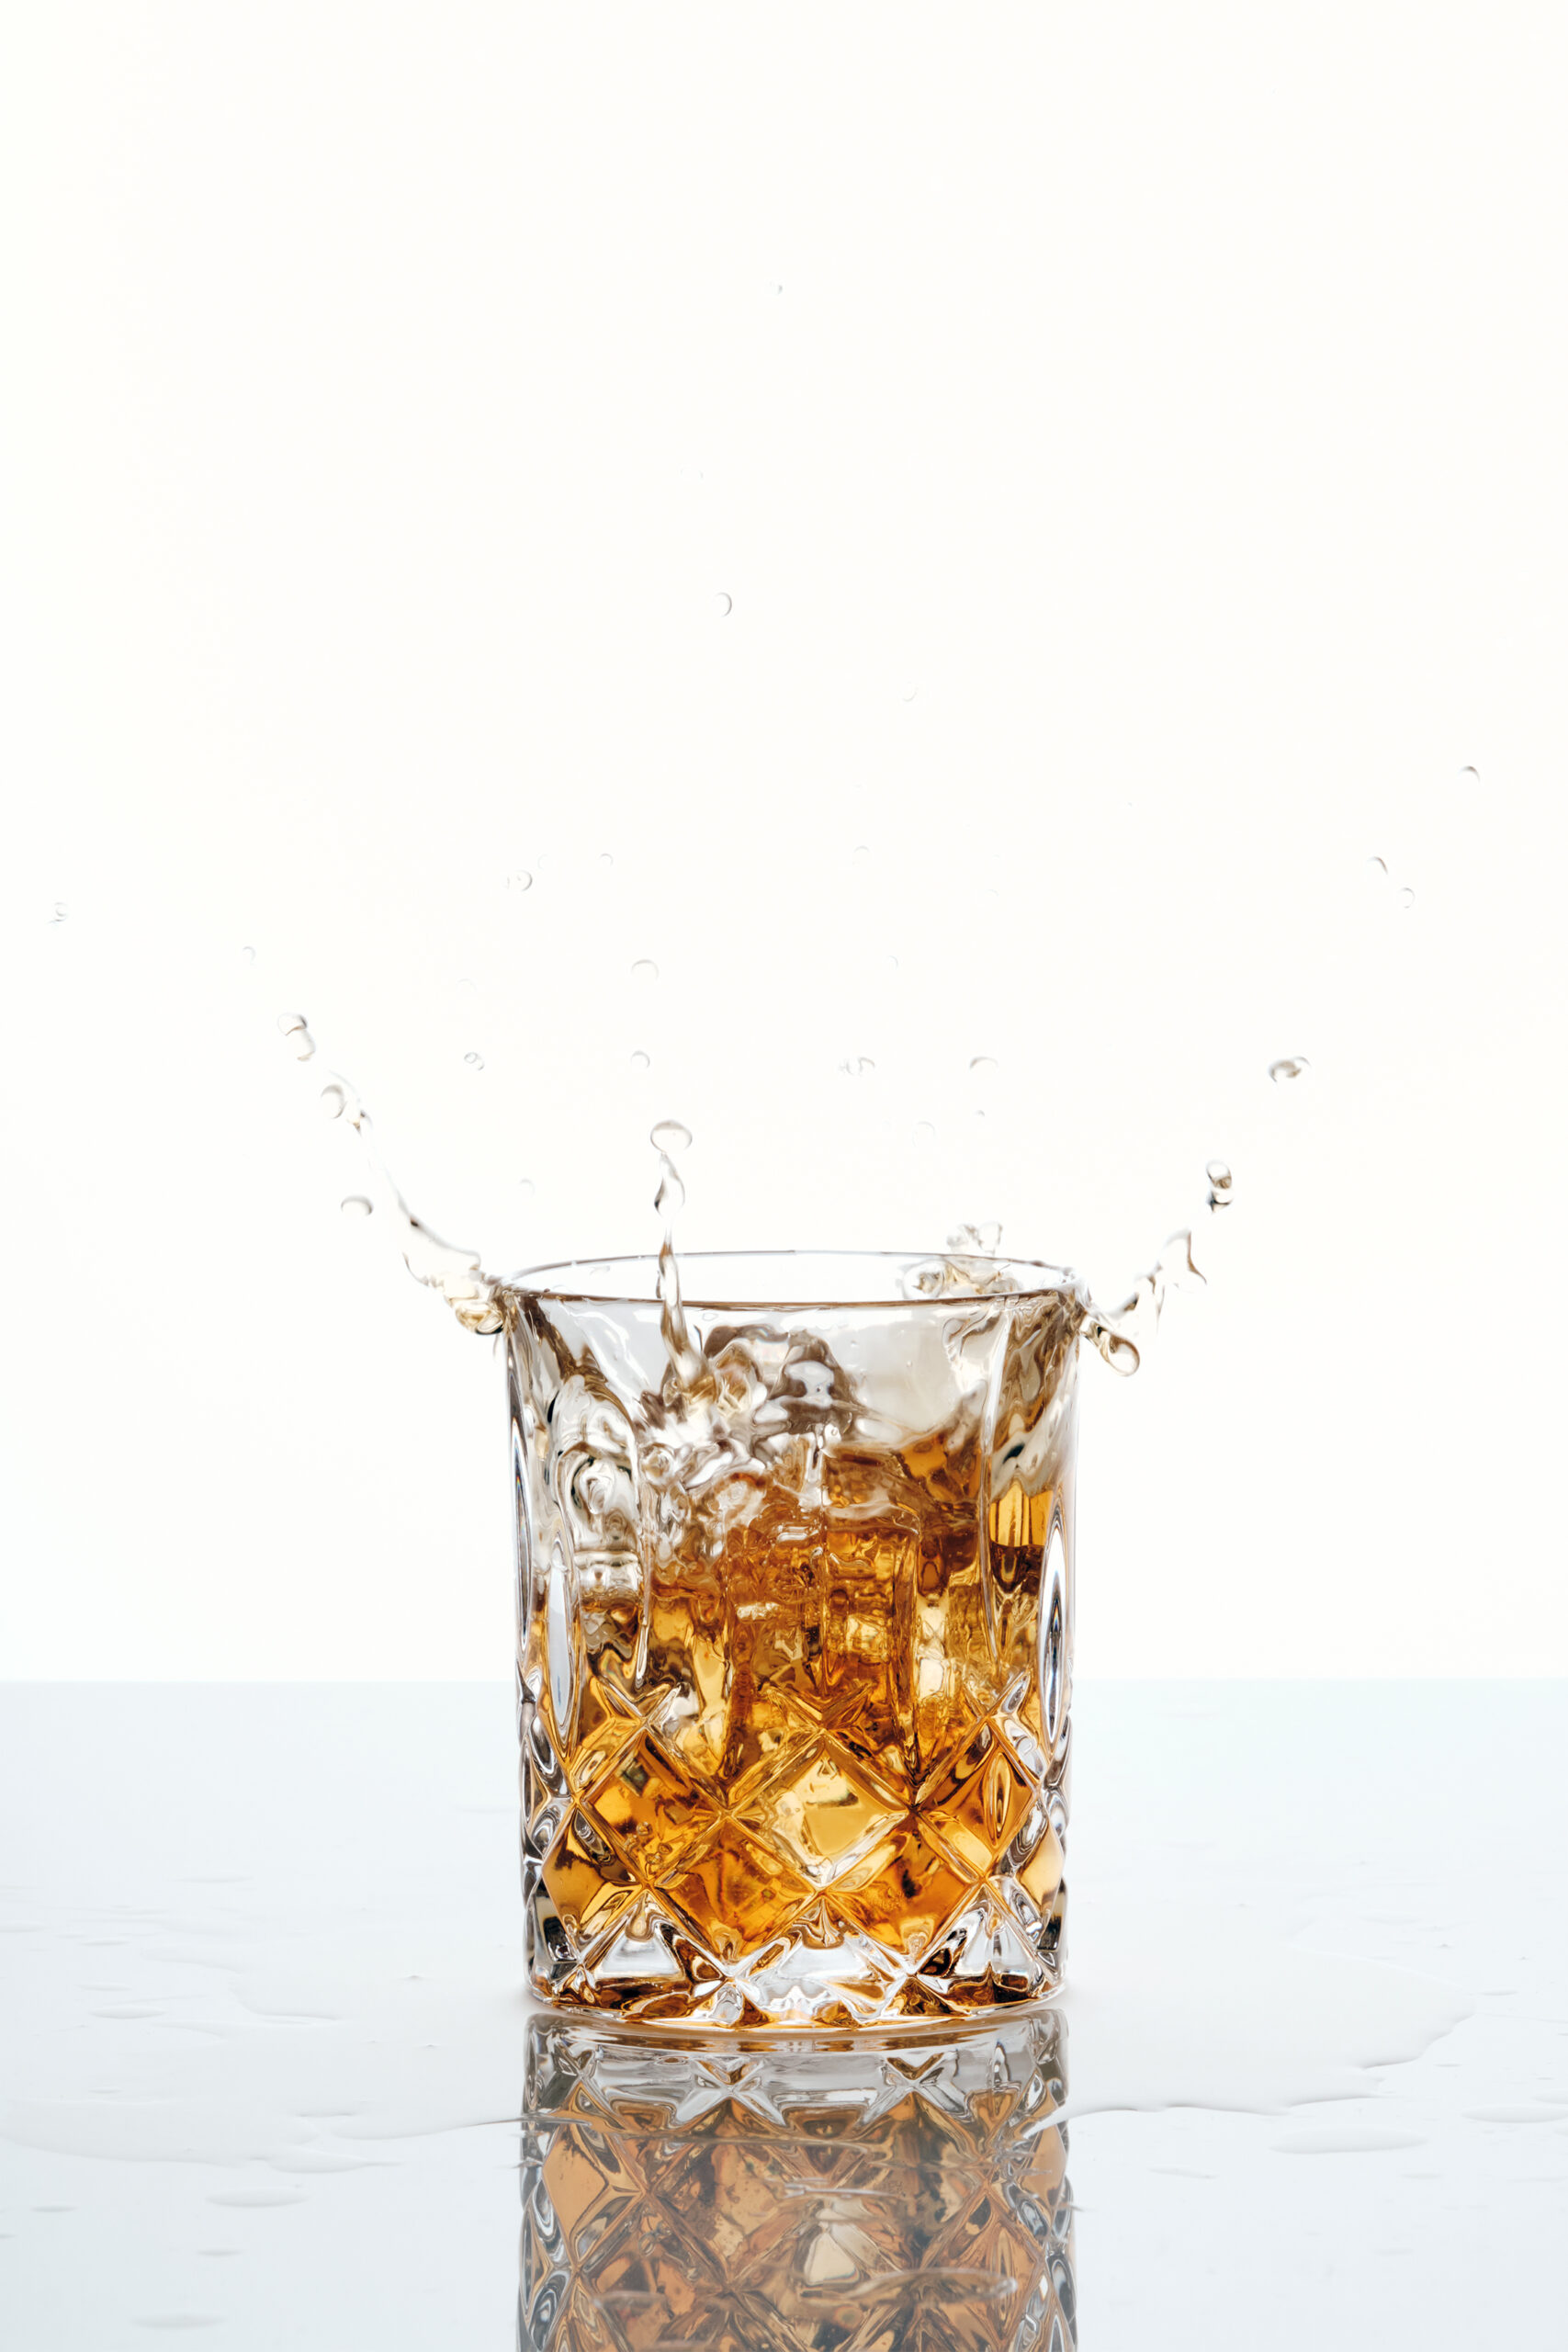
The image below is one of the splash shots that I like. Notice that the surface is pretty messy and wet? This is why we captured a clean shot first, because the only part we’ll use from the image below is the actual splash.
Step 3: Editing Splash Photography
What Is Image Compositing?
Editing is a very important piece of the puzzle in splash photography, because it involves combining multiple shots together to create one final image. This editing technique is called compositing.
Once you have a clean shot of the glass and a different splash shots that you like, you’ll be ready to start compositing your images! I am using one clean shot and one splash shot and I’ll show you how to composite the two images together to create the final image.
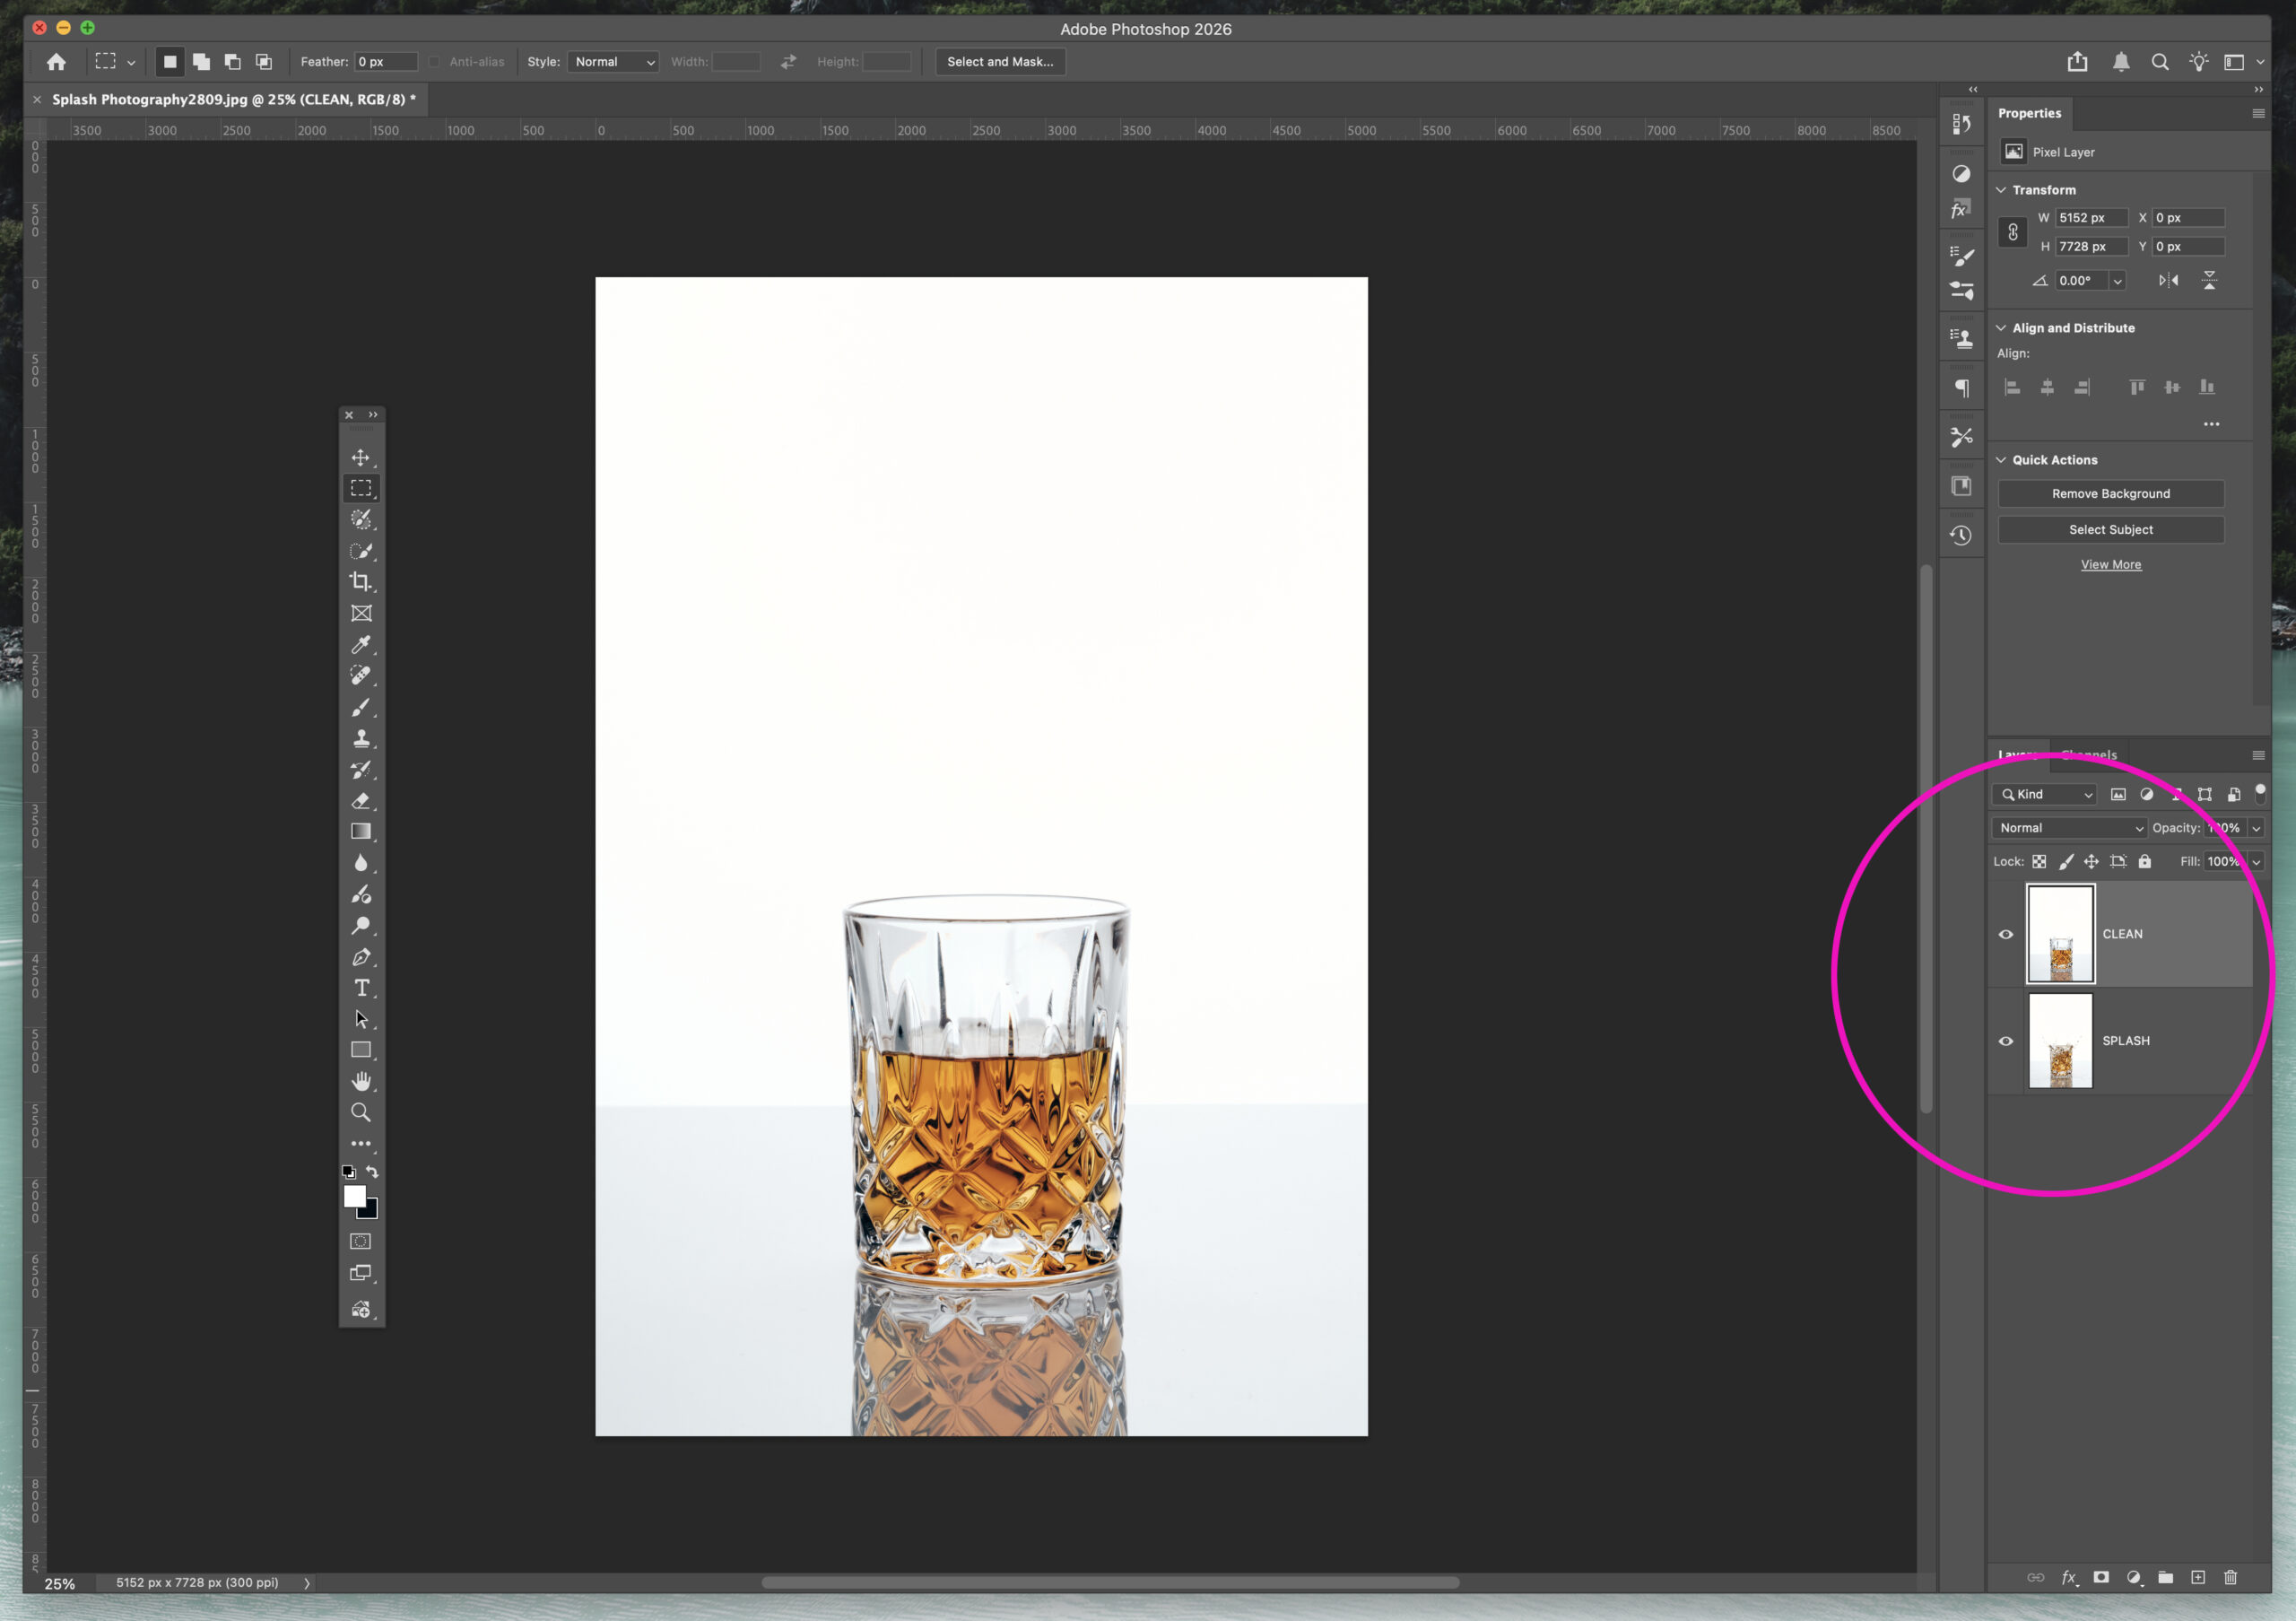
1. Open the clean image and splash image in Photoshop. Label your layers accordingly and be sure the CLEAN image is on top.
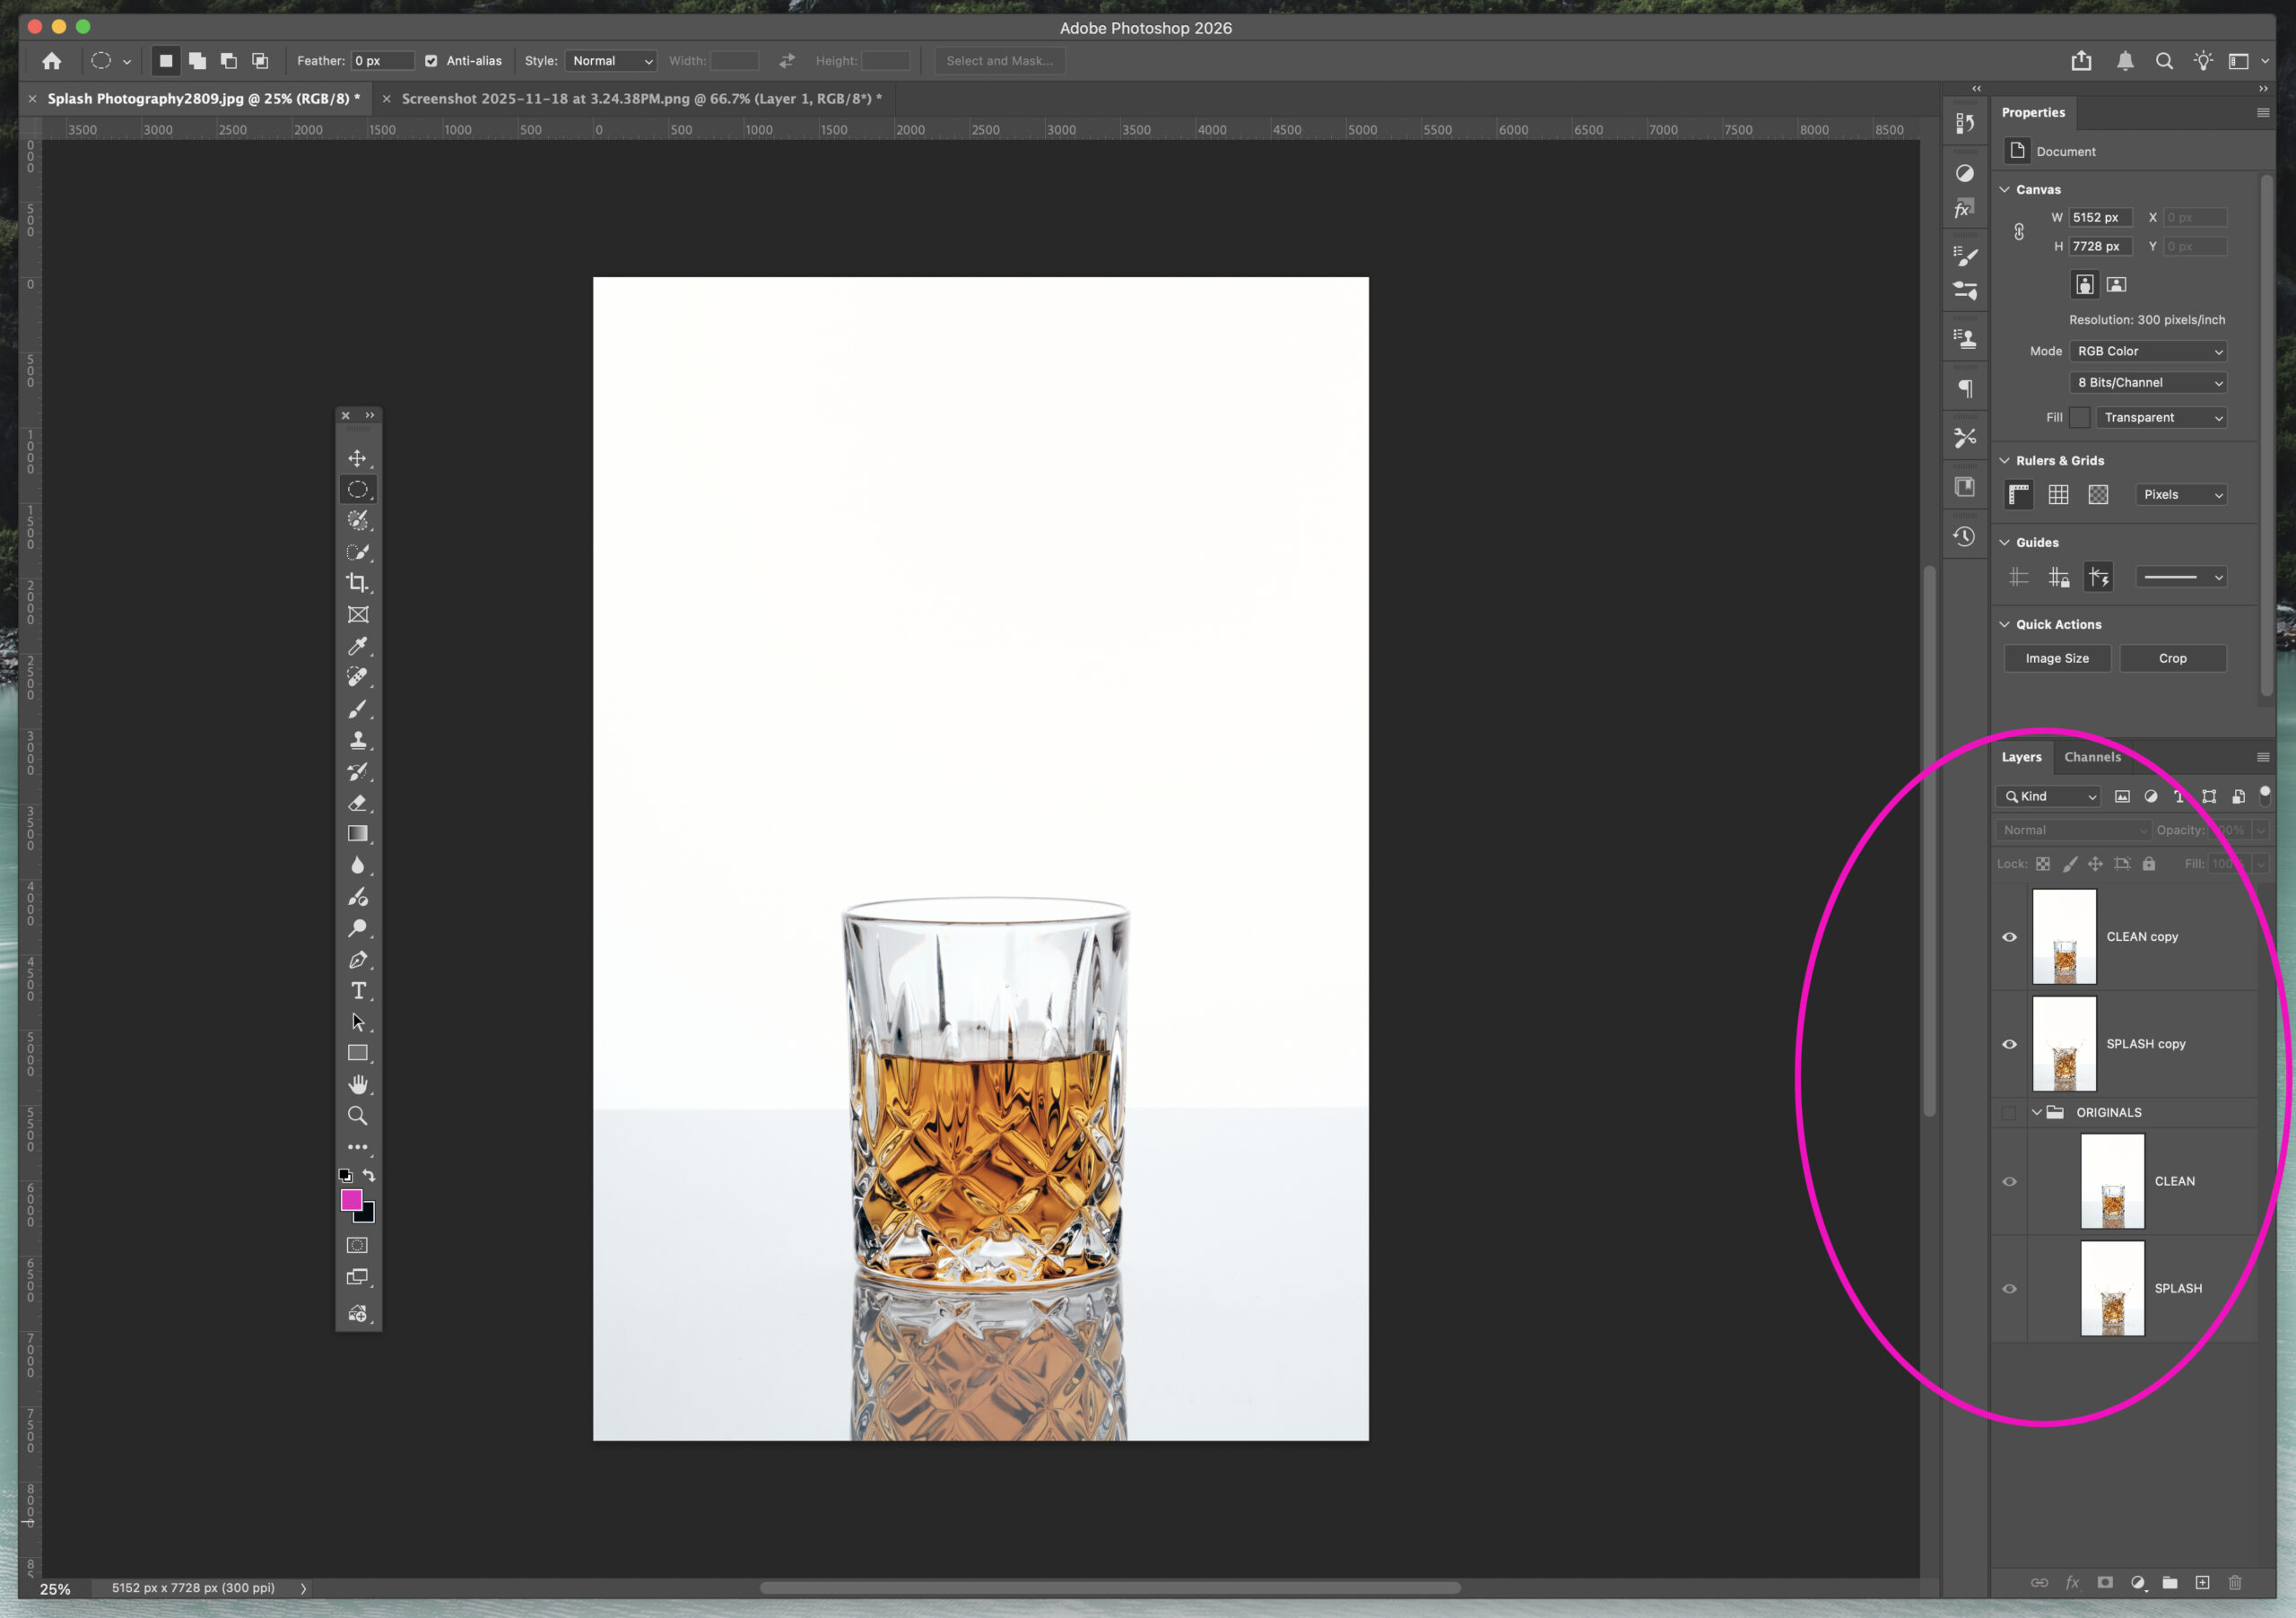
2. Create duplicates of each layer and store them in a group folder called Originals. It’s good to keep the original images in case you need to go back to them later.
3. Create a layer mask on the Clean Image layer, by selecting the white square with a hole at the bottom of the layer panel.
A: Layer mask
B: Layer mask applied to clean glass layer
C: Paint brush tool
D: Black reveals. White erases.
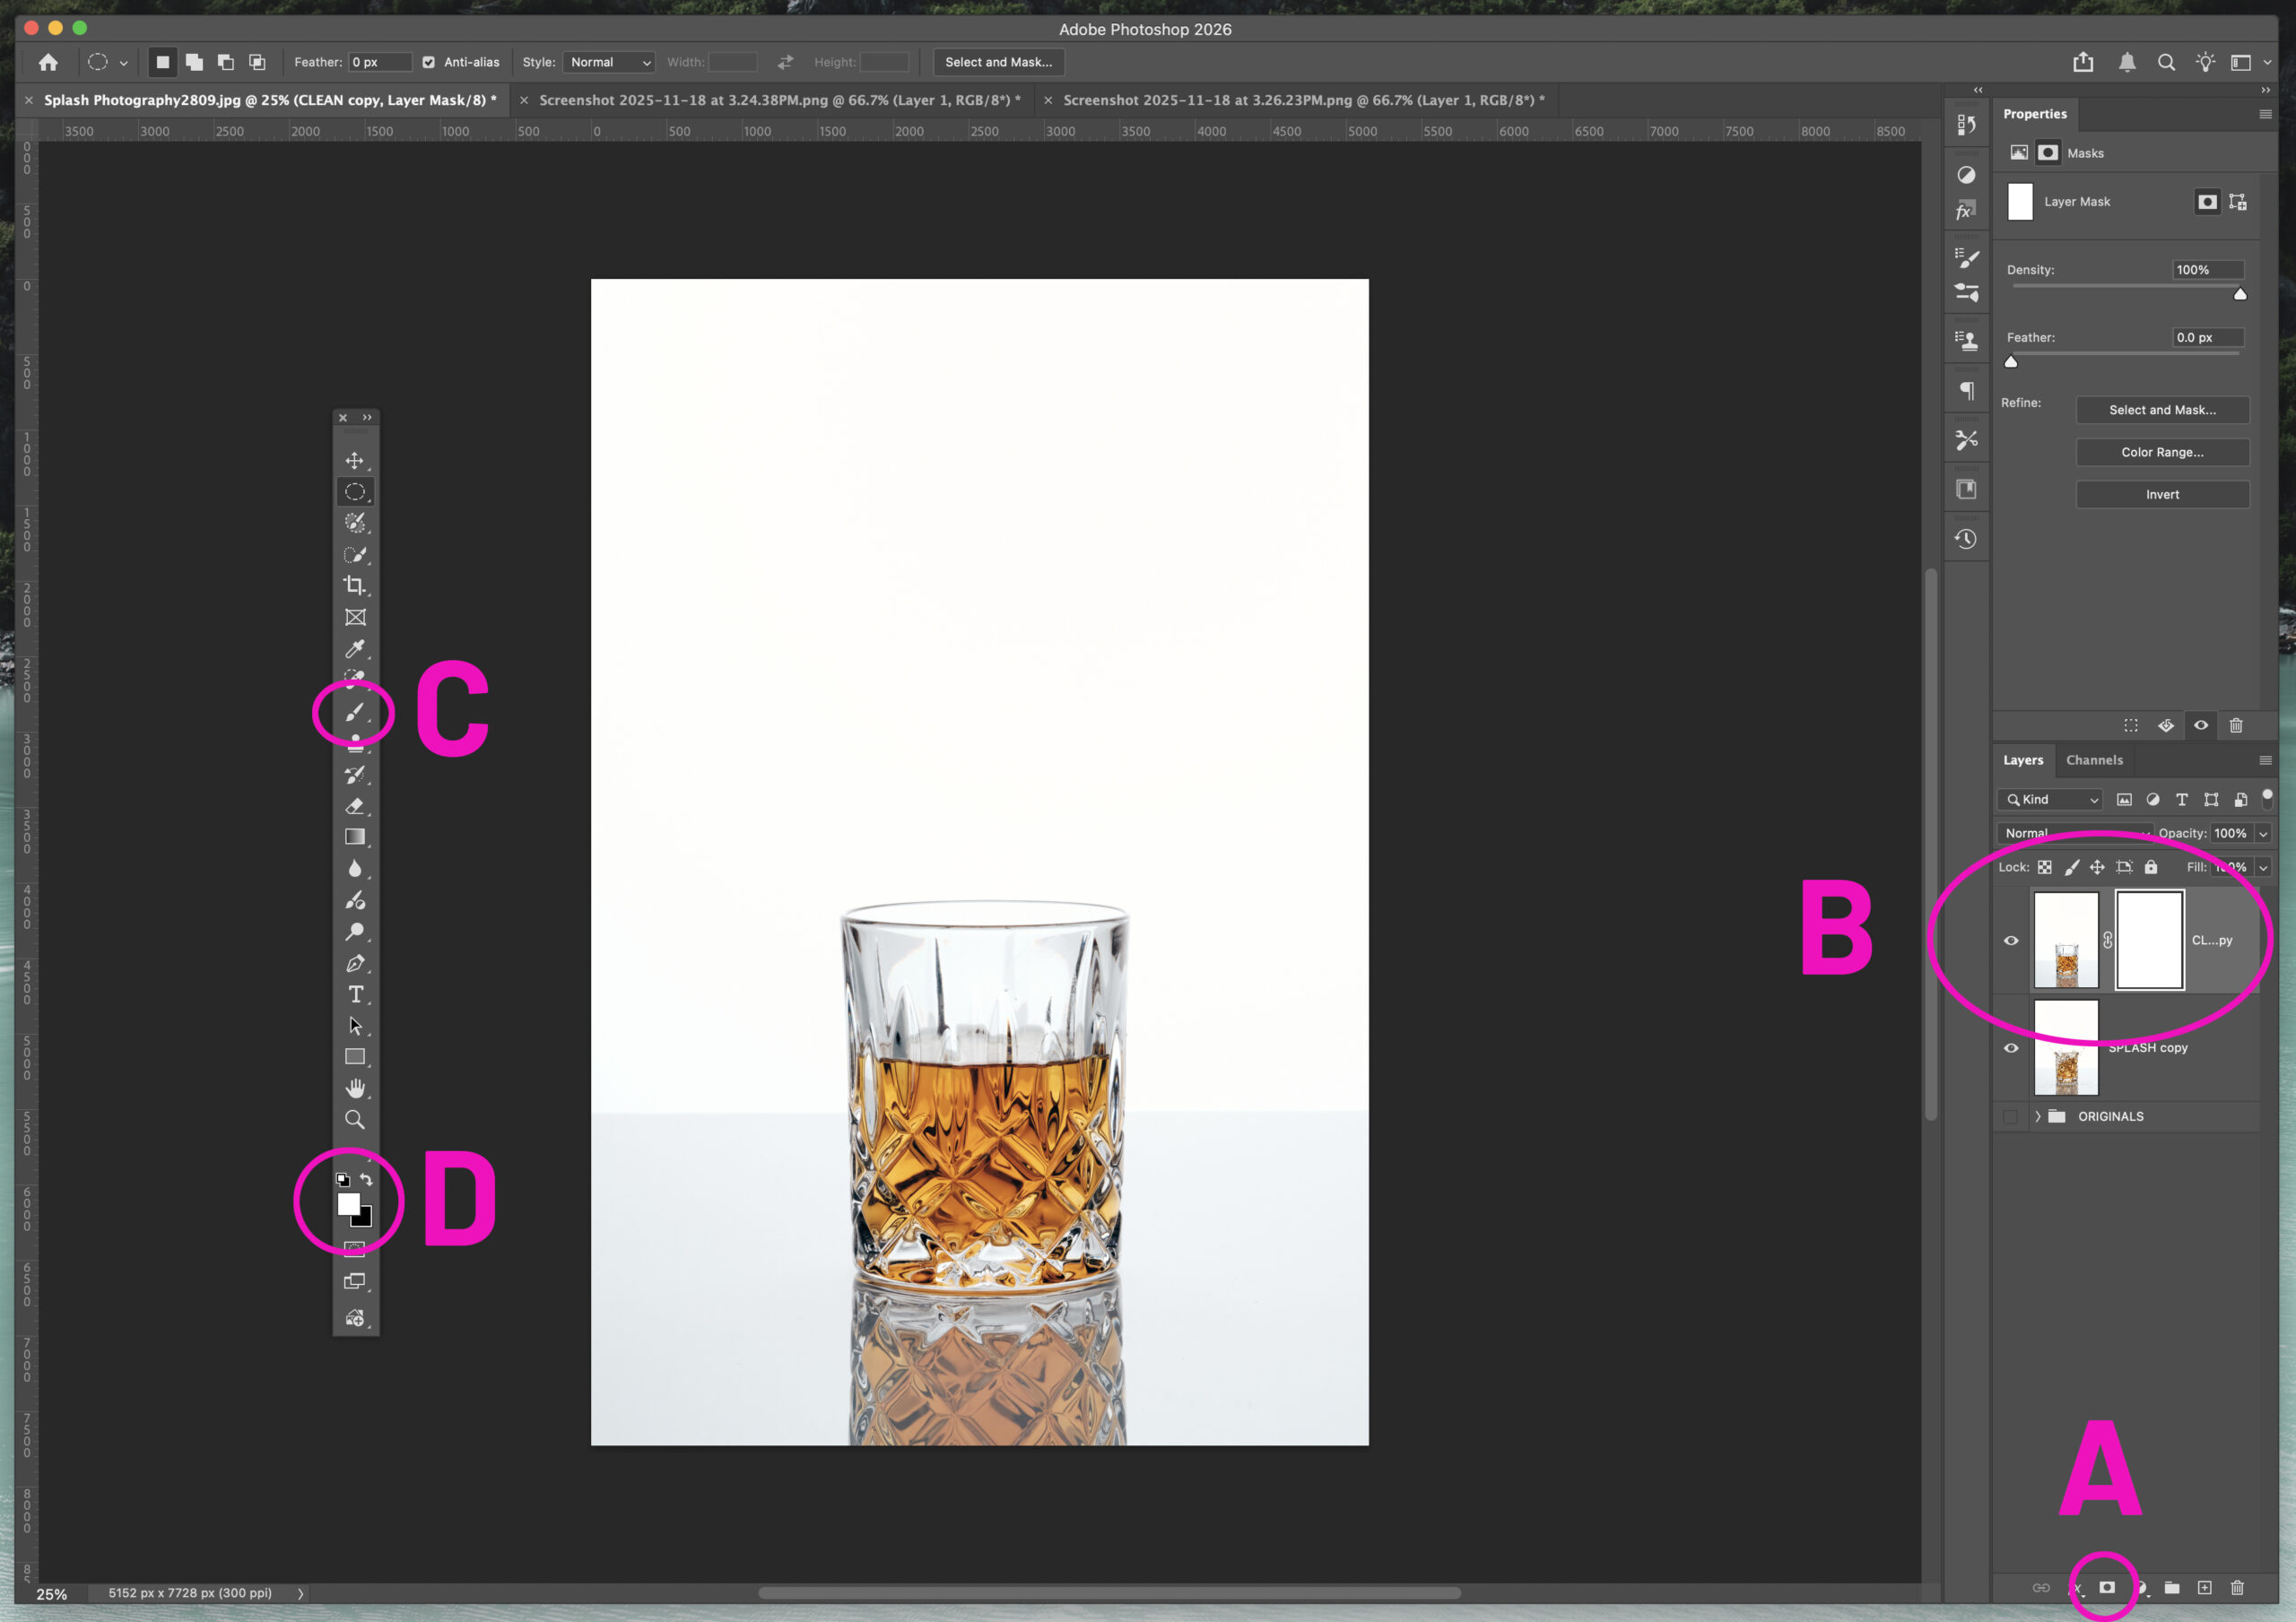
4. Select the paint brush tool to reveal or erase the layer directly beneath the Clean Glass layer. Black reveals and white erases. This is such a cool part of the process, because you get to see the splash get revealed into the clean glass.
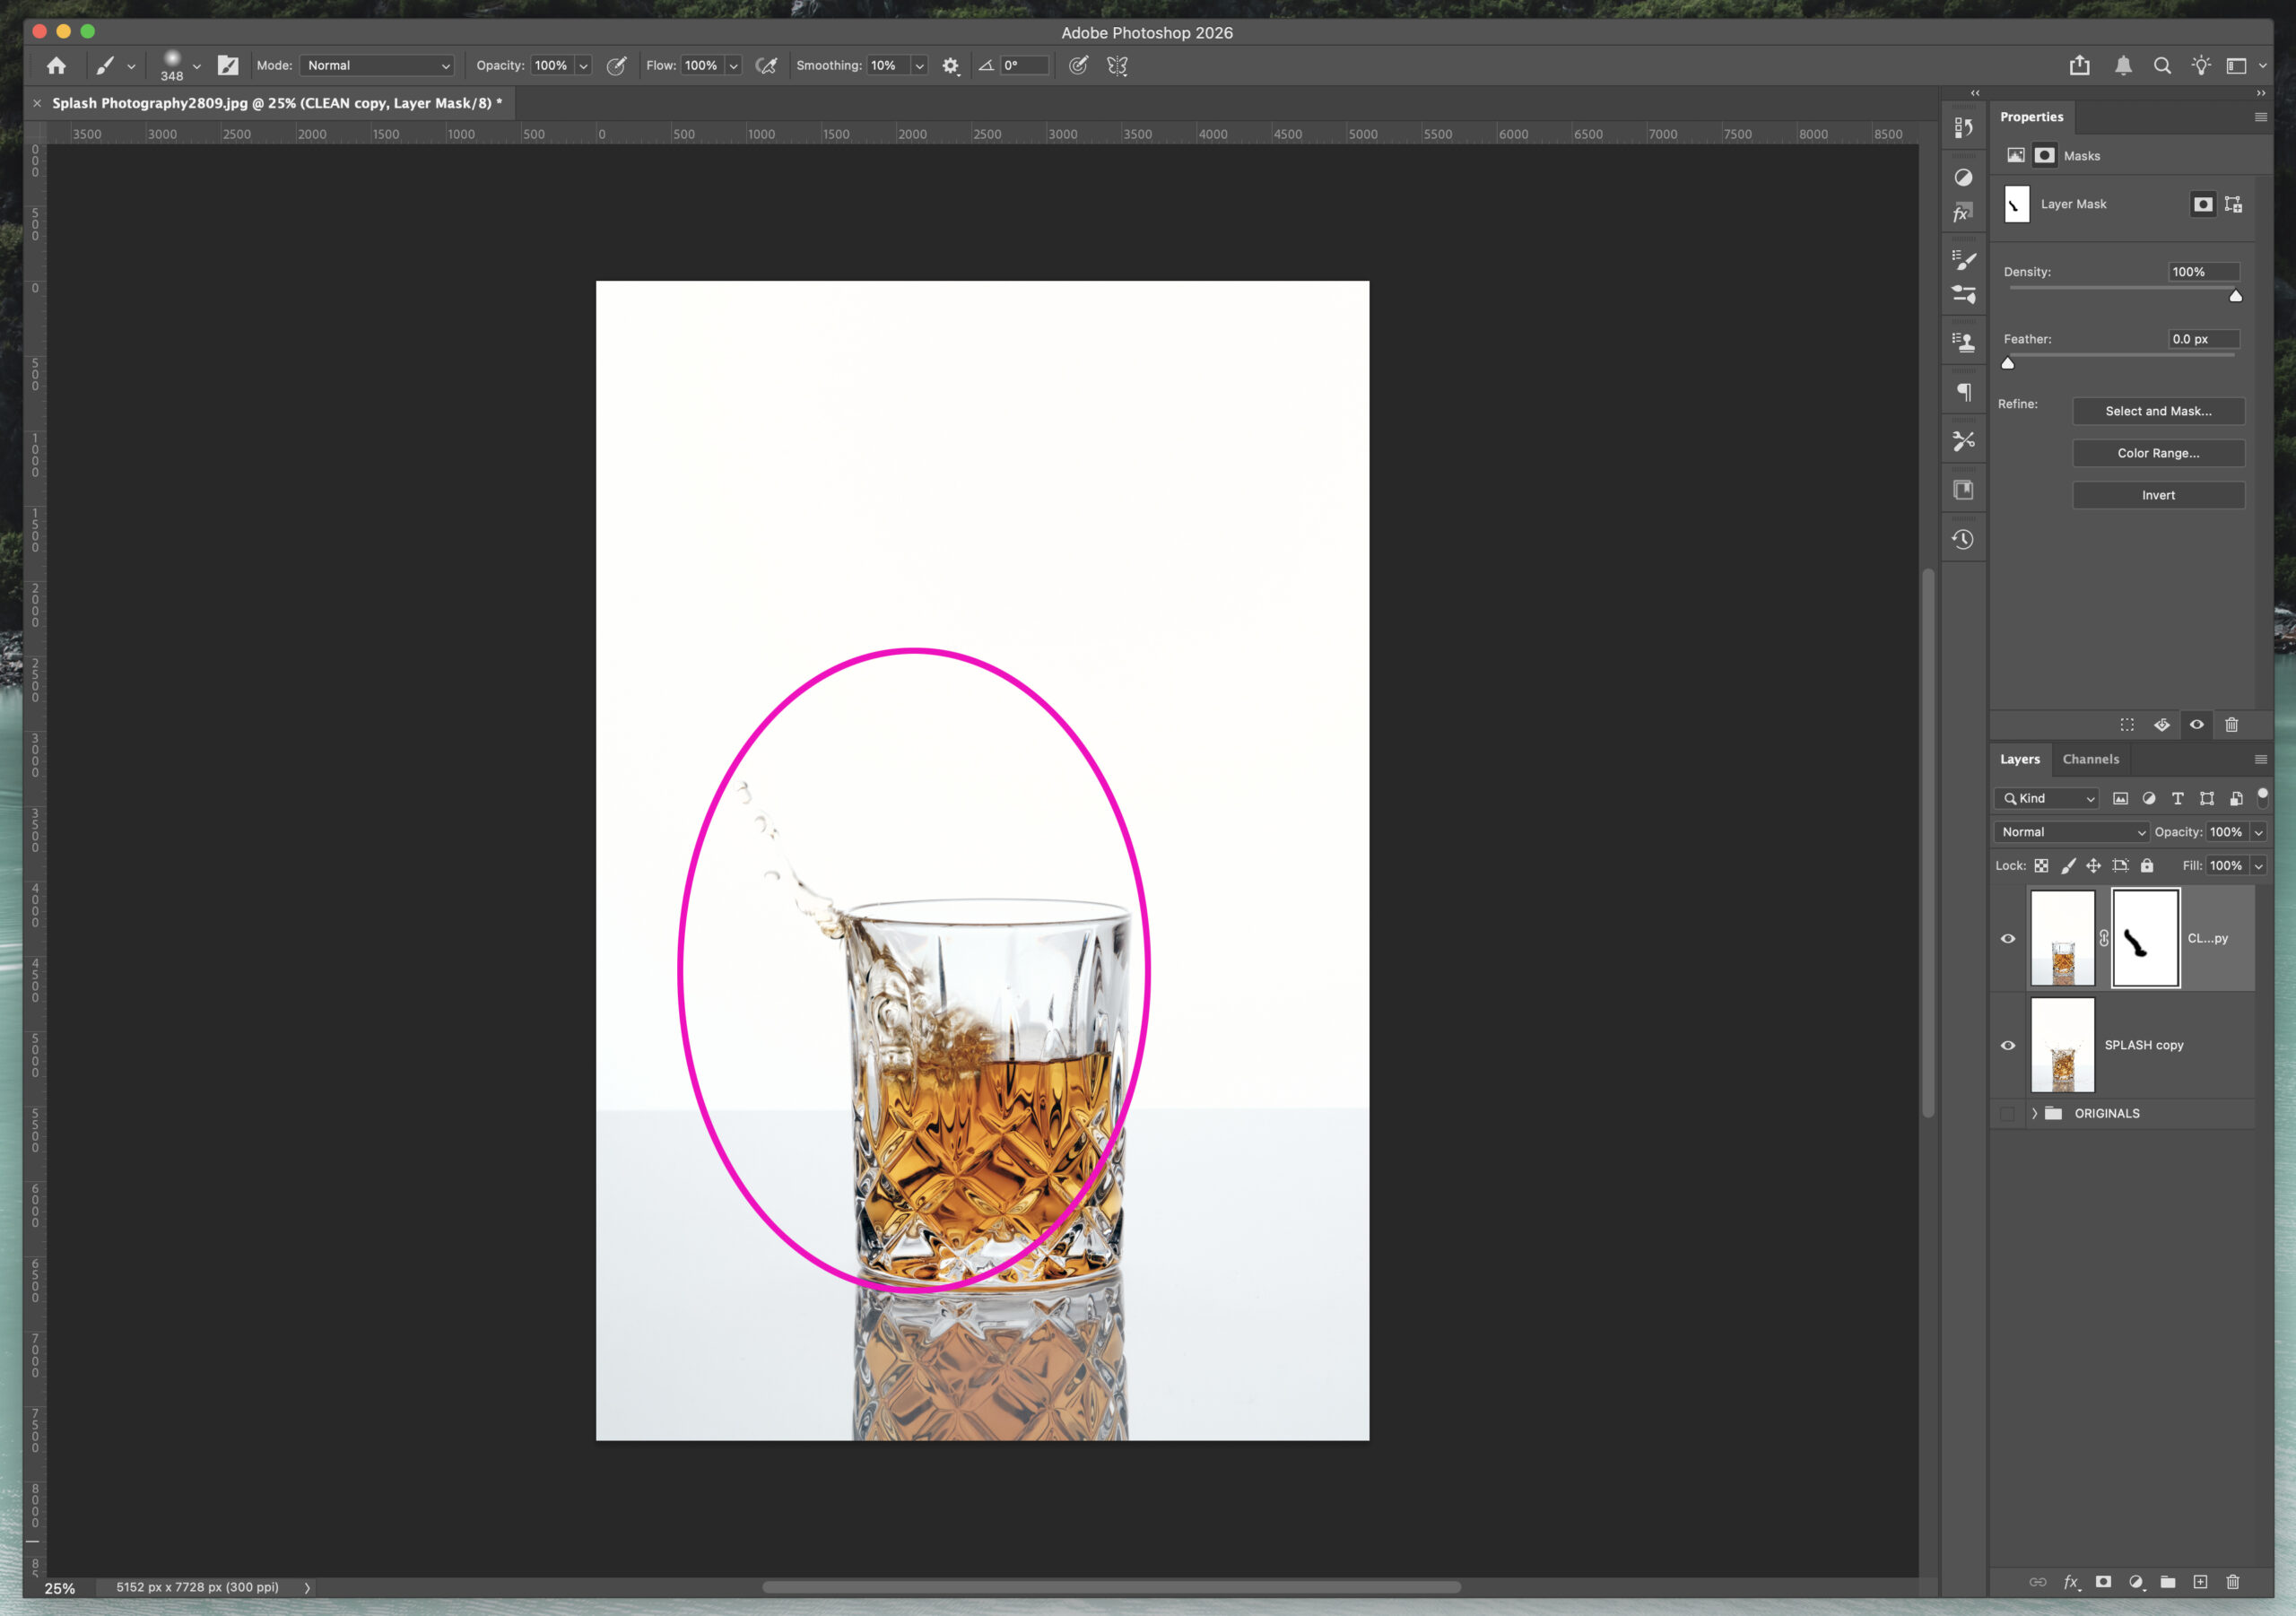
5. After you’ve combined the images the way you want, be sure to save your PSD file with your original and edited layers. Make any additional edits and clean up the image as needed and save a separate JPG file of your final image.
If you captured multiple splashes that you like, just repeat these same steps for all the splashes that you want to finalize into final images.
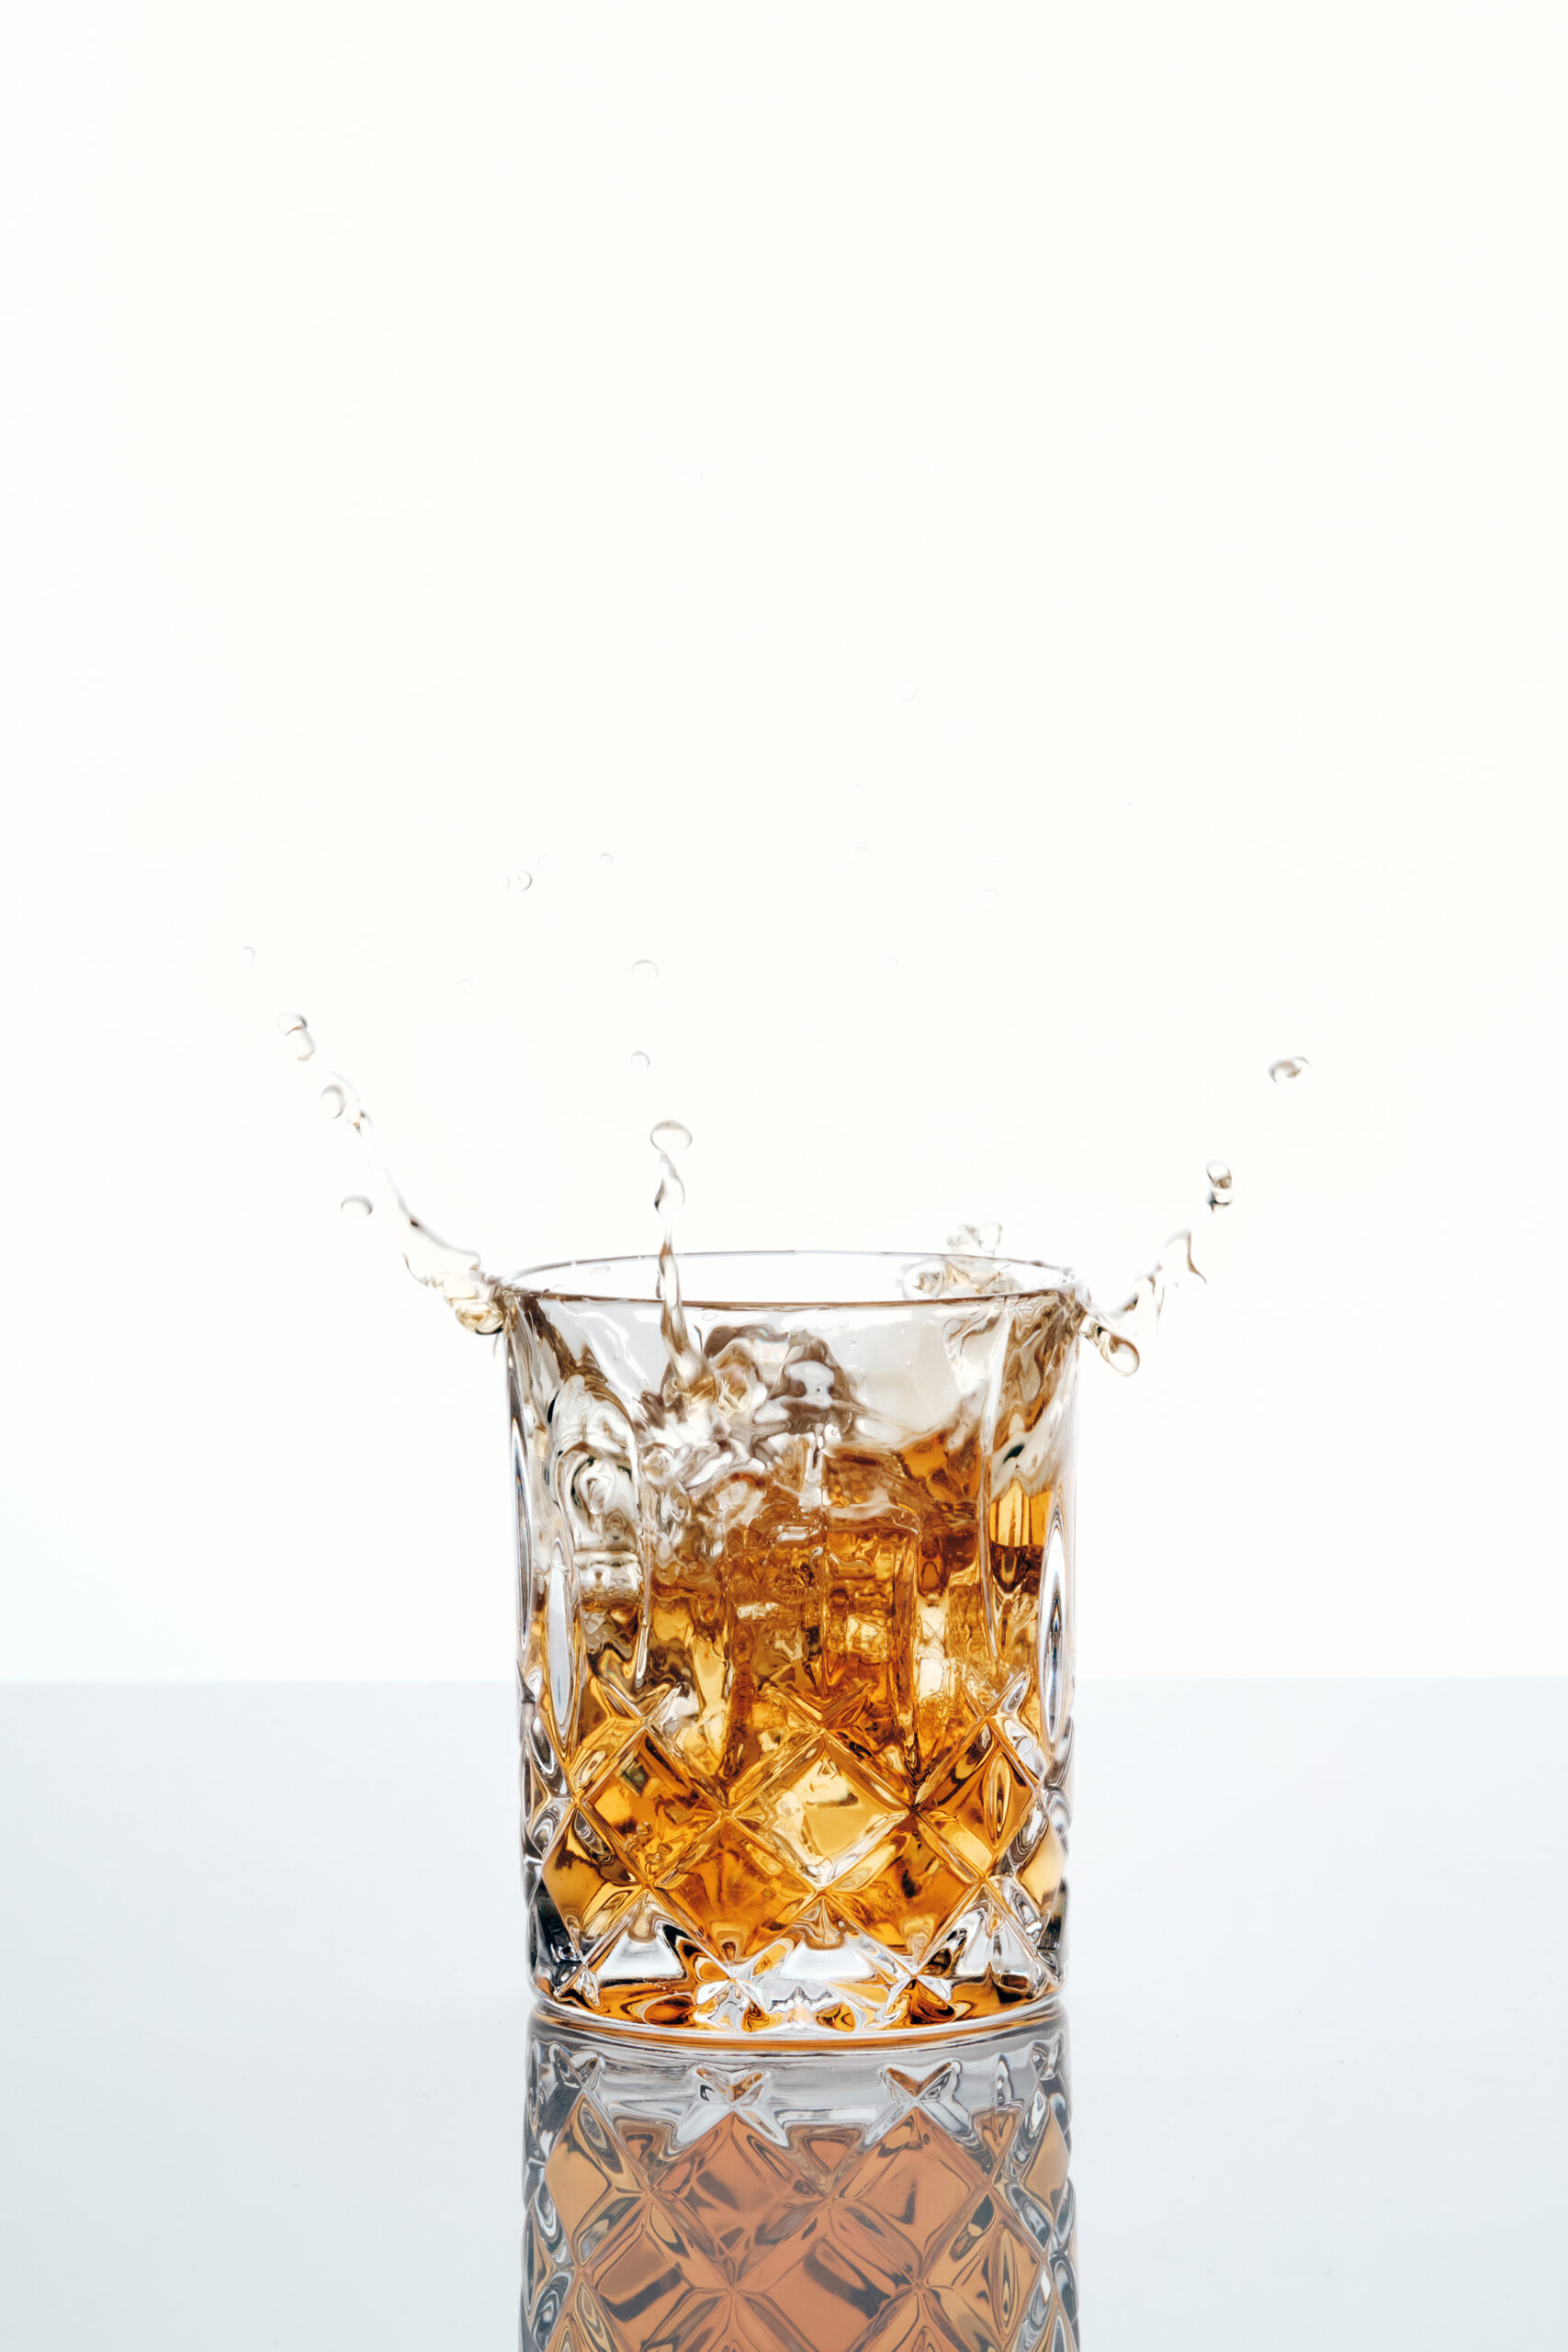
Check out my final image below.
Summary of Equipment
- Camera
- Macro Lens
- Tripod
- Remote Shutter Release
- One strobe light
- Softbox
- Large diffuser
- Light stands
- Tether cable
- Capture One
- Reflective surface
- Photoshop
What do you think? Pretty cool, right? Once you practice these steps for how to capture splash photography, you can get as creative as you want with cool props, different surfaces and interesting drink recipes. Reach out with questions any time and be sure to follow me on Instagram! 😉
Happy Creating!
This post may contain affiliate links which means if you click or make a purchase, I might make a small commission (at no extra cost to you). I only promote products and equipment that I actually use for my photography business. Your support helps me continue to produce educational content about photography. Thank you!
All images ©Regan Baroni 2025.
Comments +