Using Lightroom Mobile for iPhone food photography is a great way to improve your iPhone food images. Adobe Lightroom is a very popular editing software that a lot of professional photographers use for editing their photos. The cool thing about Lightroom Mobile is that you get access to a robust camera app and advanced editing features right at your fingertips. This post shares an overview of the Lightroom Mobile camera app, so you can start experimenting with it.
This post contains affiliate links. Read the affiliate disclosure.

Lightroom Mobile for iPhone Food Photography
DSLR & Mirrorless Cameras vs. iPhone Camera
There’s a big misconception when it comes to photography. People think they need a “fancier camera” to take better pictures. But, this isn’t necessarily true when you’re first starting out.
Photography isn’t about what kind of camera you have, it’s about knowing how to use the camera you have.
A lot of people have smartphone cameras and feel like their images aren’t standing out because the camera isn’t good enough. But, this is not true. Smartphone cameras have come a long way and are very good cameras. The problem is that people don’t know how to use the smartphone camera to its fullest potential.
DSLR & MIRRORLESS CAMERAS
A DSLR or Mirrorless camera gives you access to exposure settings to help you take more control over the exposure of your images. These settings include exposure, shutter speed and aperture.
However, when you keep your DSLR/Mirrorless camera in Auto mode, the camera will make all of the decisions about these exposure settings for you. And, while this sounds nice in theory, it’s not how these types of cameras are intended to be used. And, if you have a “fancy camera” and keep it in auto mode, it’s very similar to carrying around a much bigger and clunkier smartphone camera.
Until you get more experience with adjusting exposure settings, it doesn’t really make sense to get a “better camera” if you aren’t going to learn how to actually use it.
iPHONE CAMERA
Did you know that the smartphone cameras have the ability to work similarly to the DSLR/Mirrorless cameras? Yep! You have the ability to control exposure, shutter speed and ISO right at your finger tips.
The thing is, you can’t access all of these exposure settings from the standard camera app alone.
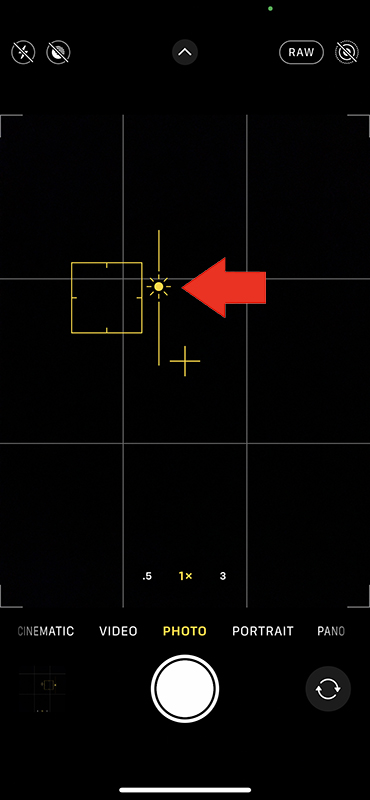
You can only adjust the exposure by tapping the screen and moving the sunshine icon up or down. And, while this is a really nice feature, the standard camera app still doesn’t unlock the full potential of your smartphone camera. So, where are those extra exposure settings?
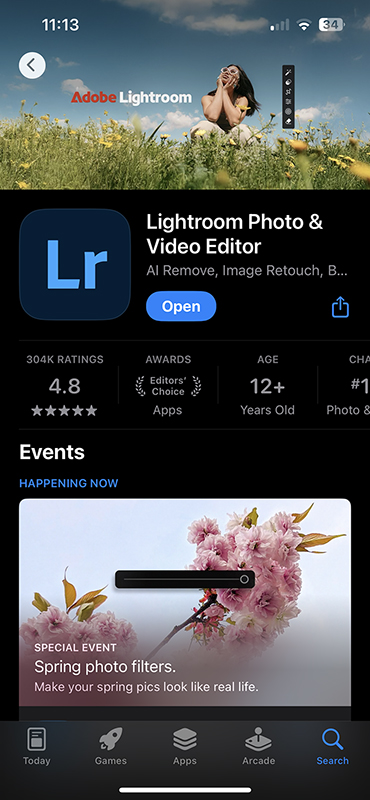
Lightroom Mobile, a third-party camera app, is a better choice than the standard camera app, because you get access to important exposure settings.
When you use the standard iPhone camera app, you are technically shooting in auto mode, which is just like taking pictures with a DSLR/Mirrorless camera in auto mode. When you download Lightroom Mobile, you can open up the professional settings of the camera app and start learning how to adjust exposure, shutter speed and ISO, which is similar to shooting in manual mode on a DSLR/Mirrorless camera.
Lightroom Mobile is compatible with all smartphones (not just the iPhone). Download the app from the App Store and let’s get started!
Lightroom Mobile Camera Settings
Professional vs. Auto Mode
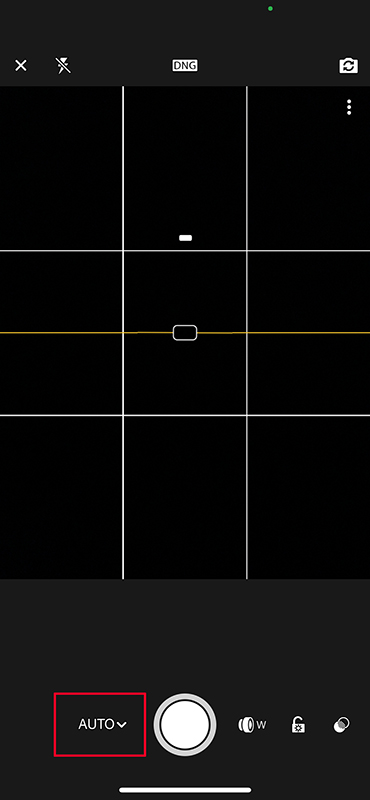
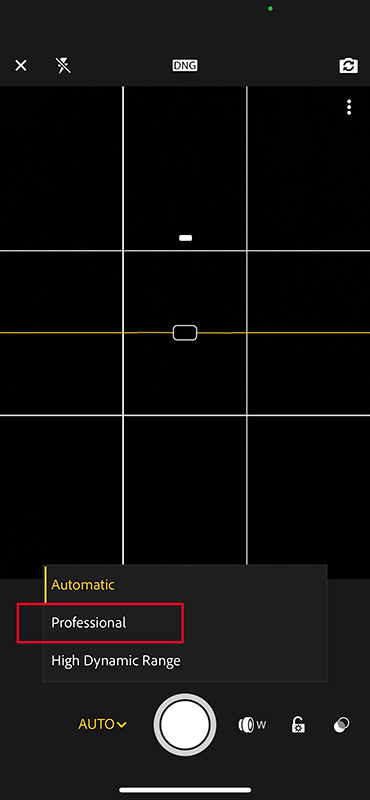
After you’ve downloaded the Lightroom Mobile app, you’ll need to switch from AUTO to PRO mode. The app will default to Auto mode, which hides the extra exposure settings. Opening Professional Mode will open the extra exposure settings.
How to open Professional Mode with Lightroom Mobile
- When you first open the LR camera app it will default to Auto in the lower left corner.
- To change this setting, tap Auto in the lower left corner and select Professional from the menu that pops up.
- After you have switched to Professional mode, you’ll see more camera settings show up at the bottom of the screen.
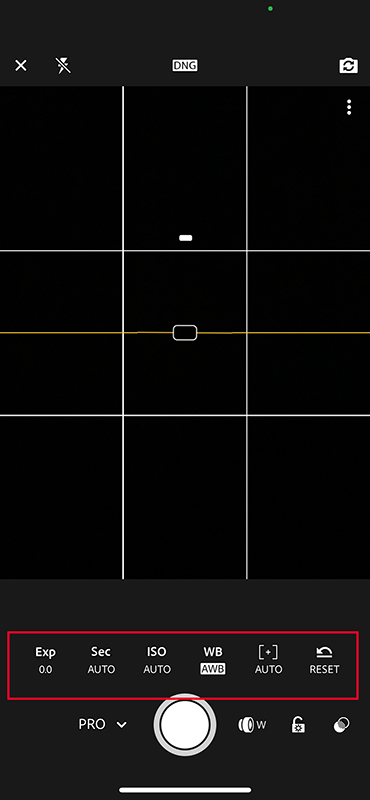
The additional camera settings you’ll see at the bottom (from left to right) include:
- Exposure (Exp)
- Shutter Speed (Sec)
- ISO
- WB (white balance)
- Auto & Manual Focus
- Reset
Exposure (EXP)
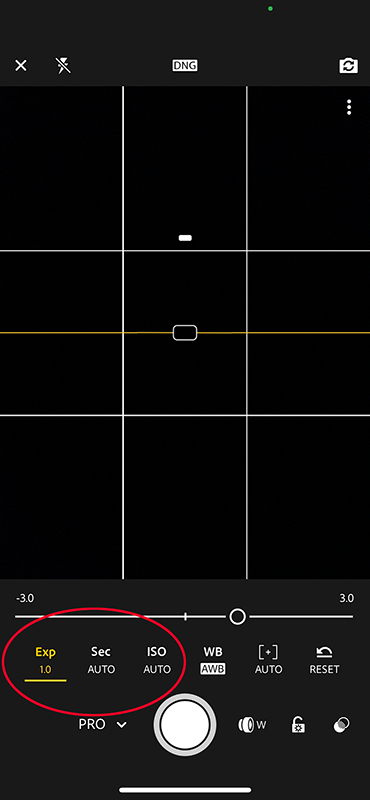
Your exposure is how bright or dark you want your image to be. To adjust this, tap EXP and move the slider left or right and watch what happens to your image.
The thing to note is that when you adjust your EXP, the SEC and ISO go into Auto Mode and you won’t be able to adjust them. They will say AUTO beneath them. This acts similarly to using the standard camera app, because you can only adjust the exposure, but no other settings… and this isn’t an effective way to use the Lightroom Mobile camera app.
If you want full control to adjust the SEC and ISO separately (which I highly recommend), leave EXP set at 0.
Shutter Speed (SEC)
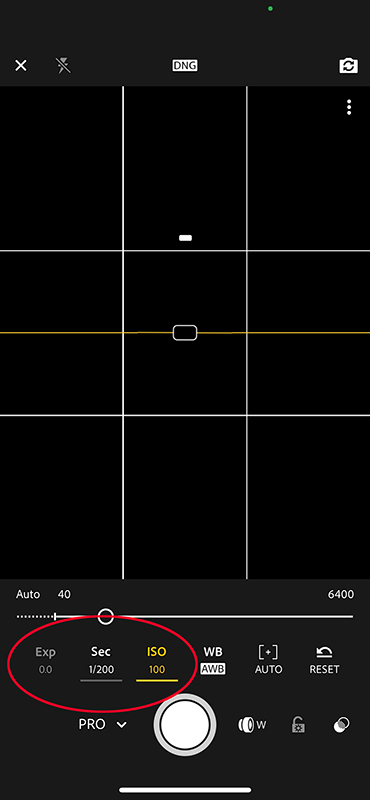
The Sec is your shutter speed. To adjust it, just tap the SEC and move the slider left or right. Your shutter speed is basically how fast your camera takes the picture.
A faster shutter speed will help make your image appear darker. You can also freeze motion (no blur) with a faster shutter speed. For example, you might want to freeze the motion of a splash if you were shooting drinks.
A slower shutter speed will help make your image brighter. This also allows you to blur motion instead of freeze it. For example, you might want to capture fast moving hands prepping food in the kitchen.
Keep in mind that a slower shutter speed might require you to stabilize your iPhone on a tripod. This is because slower shutter speeds pick up camera shake from you holding the camera.
READ MORE ABOUT: THE BEST TRIPOD FOR SMARTPHONE FOOD PHOTOGRAPHY
ISO
ISO is how sensitive your camera is to light. To adjust this, tap ISO within the settings and move the slider left and right.
The higher your ISO, the more sensitive your camera will be to light, which helps make your image brighter. Keep in mind that a higher ISO can cause noise or a grainy look in your images.
The lower your ISO, the less sensitive it will be to light.
With food photography, it’s important to keep your ISO low and adjust your SEC accordingly.
WB
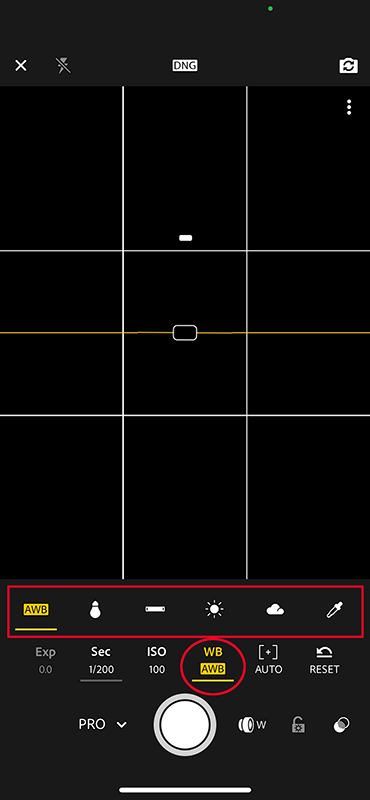
Your white balance is the color temperature of your image. Sometimes images can appear too blue (cool) or too yellow (warm) depending on your lighting. To adjust this, tap the WB and select from the options that pop up.
The WB options include (from left to right):
- AWB (AWB stands for auto white balance)
- Tungsten
- Fluorescent
- Daylight
- Cloudy
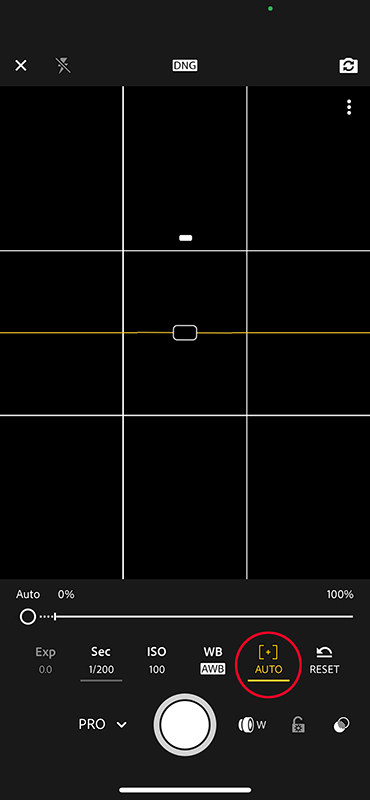
Auto & Manual Focus
Auto focus is usually pretty reliable with smartphone cameras, but if you want to experiment with Manual focus, tap the little brackets with the plus sign. A slider will appear that you can slide left or right.
As you move the slider in one direction, the areas that you’re manually focusing will highlight in green. The green highlights indicate where the focus is being set manually.
Reset
Reset does exactly what you think it will do. If you adjust all of your settings for one image and want to start from scratch for the next image, you can tap Reset and it will reset your settings so you can start fresh.
READ MORE ABOUT: Good Photography Apps for the iPhone
Lightroom Mobile Image Format Settings
You have the ability to adjust your image format settings with Lightroom Mobile. You get to choose between DNG and JPG, so let’s talk about what each of them mean.
DNG Image Format
DNG is the iPhone’s version of a RAW image. This is an uncompressed image that is the best format for editing your images. The drawback is that because they are uncompressed images, they will take up more space in your image library. I recommend using the DNG format for full editing capabilities. Once you edit your images, they will automatically get turned into a JPG for you.
JPG Image Format
JPG images are compressed images, which means you won’t have as much flexibility with editing. You can still edit a JPG image, but with less flexibility than a DNG image. The nice thing about a compressed image, however, is that it won’t take up as much space in your image library.
HOW TO SET YOUR IMAGE FORMAT TO DNG OR JPG
- Open the LR Mobile camera app and tap the DNG or JPG at the top center of the screen.
- It will open up a pop up box that says DNG or JPG.
- Select which format you prefer to use.

Extra Camera Tools in Lightroom Mobile
There are a few more camera tools that you can play with in the Lightroom Mobile camera app that may come in handy. If you click the three dots in the upper right corner of the screen, the extra tools will appear.
From left to right, they include:
- Aspect Ratio
- Timer
- Grid & Level
- Highlight Clipping and Settings

Aspect Ratio
Your aspect ratio is where you choose the width and height of your image. You can choose between 16:9, 3:2, 4:3 and 1:1. Consider where you are sharing your images and choose the aspect ratio that will work best with the size requirements. This is a quick Google search if you’re not sure since social media sizing requirements can change.
Timer
You can set a timer for when you want your iPhone to take the picture. I don’t recommend using the timer, though, because it can be tricky to get the timing just right. It will take up a lot of your time to practice getting it just right too. So, a good work around is I suggest getting a remote shutter release instead. This little tool helps you take a picture without needing to touch your iPhone or having to master the timing of the timer.
Grid & Level
The grid is a really great tool to help you with your image composition. There are different grids to choose from, but I highly recommend the “thirds” grid so you can start thinking about the Rule of Thirds with your compositions.
The level is also great, because it will let you know if your camera is positioned correctly. For example, with overhead shots, it’s easy to assume your camera is in the right position. But, even if it’s slightly off, it could affect how your image looks making it look sort of awkward. The level will align when it’s in the right spot and will look broken when it’s off. Take advantage of that tool so your images come out looking straight.
READ MORE ABOUT: FOOD PHOTOGRAPHY COMPOSITION TIPS
Highlight Clipping
The highlight clipping in the LR camera indicates when your image may have certain areas that are too overexposed or underexposed. Usually when this highlight occurs, it means there isn’t any information within the image to work with, so you won’t be able to correct it during editing. You’ll want to avoid having areas of your image too bright or too dark by adjusting your camera settings to create a nicely exposed image.
Settings
The three dots either hide or reveal these extra settings. Simply tap it to hide or show the extra settings as you need them.
Lightroom Mobile for iPhone food photography is a really great camera tool. Take some time to experiment with each of tools and settings to see how they can help your images improve.
And, if you’re curious about learning even more about iPhone food photography, check out my signature course Mastering iPhone Food Photography. It’s a one-stop-shop that gives you a full suite of professional insight, videos, slides, screen recordings, behind-the-scenes demonstrations and resources to help you significantly improve your iPhone food images.
Happy Creating!
READ MORE ABOUT: IPHONE PHOTOGRAPHY TIPS & ACCESSORIES
This post contains affiliate links which means if you click or make a purchase through my site, I might make a small commission (at no extra cost to you). I only promote products and equipment that I actually use and support.
All images ©Regan Baroni 2022.
Comments +